- Products & services Products & services
- Resources Resources
- Community CommunityDiscussion
- Discussion
- Knowledge
- IdentityIQ wiki Discover crowd sourced information or share your expertise
- IdentityNow wiki Discover crowd sourced information or share your expertise
- File Access Manager wiki Discover crowd sourced information or share your expertise
- Submit an idea Get writing tips curated by SailPoint product managers
Knowledge
- Compass
- :
- Discuss
- :
- Community Wiki
- :
- IdentityIQ Wiki
- :
- IdentityIQ 7.2: Policy Violation UI Changes
- Article History
- Subscribe to RSS Feed
- Mark as New
- Mark as Read
- Bookmark
- Subscribe
- Printer Friendly Page
- Report Content to Moderator
IdentityIQ 7.2: Policy Violation UI Changes
IdentityIQ 7.2: Policy Violation UI Changes
Return to What's New in IdentityIQ 7.2
- The IdentityIQ 7.2 Policy Violations UI
- Summary of changes
- Video
- UI Overview
- How To
- Allow a violation item
- Correct/revoke a violation item
- Certify a violation item
- Delegate a violation
- Enable or disable delegation of policy violation items
- Edit a decision
- Filter violation Items
The IdentityIQ 7.2 Policy Violations UI
A new Policy Violations user interface is introduced in IdentityIQ 7.2 to make processing violations easier and more intuitive. This new UI separates key policy violation data out to multiple tabs for a cleaner review process, and moves the processing actions to a single, central page, streamlining users' access to their policy violation tasks.
Summary of changes
- A new centralized page for reviewing and acting on policy violations:
- New tabbed interface listing all policy violations, on either an Open (awaiting action) or Completed (processed items) tab.
- All actions are taken on these Open and Completed tabs; you no longer need to click through to individual item details in order to process an item.
- Changes to button/action names:
- A Bulk Decisions button/drop-down on the main page replaces the Select Decision button/drop-down on the policy violations detail page
- A Revoke button on the main page replaces the Correct Violation violation decision option for individual items.
- A Save Decisions button is displayed/active at the bottom of the screen any time a decision is made; you must click Save to save your decision(s).
- Certify decisions are now available only as a bulk action.
- Enhanced Filtering options for sorting and searching
- When allowing Policy Violations, unless the Enable Allow Exceptions Popup option is selected (via the gear menu > Compliance Manager settings), a reviewer can not change the defaulted Allow Until date.
Many of the fundamental ways the Policy Violations UI works are unchanged from or very similar to earlier versions of IdentityIQ. For example, the items listed in the Policy Violations UI are detected violation items, not requested items or alerts that appear as work items. Also, as in earlier releases, the My Work > Policy Items menu option will bring up a list of all the violations you are permitted to view (for example, system administrators and users with the Policy Administrator capability will see all violation items in the entire system), whereas clicking the Policy Violations tile on the home page will bring up a list of only the violation items you are an owner of.
Video
This video gives an overview of the new Policy Violations UI
UI Overview
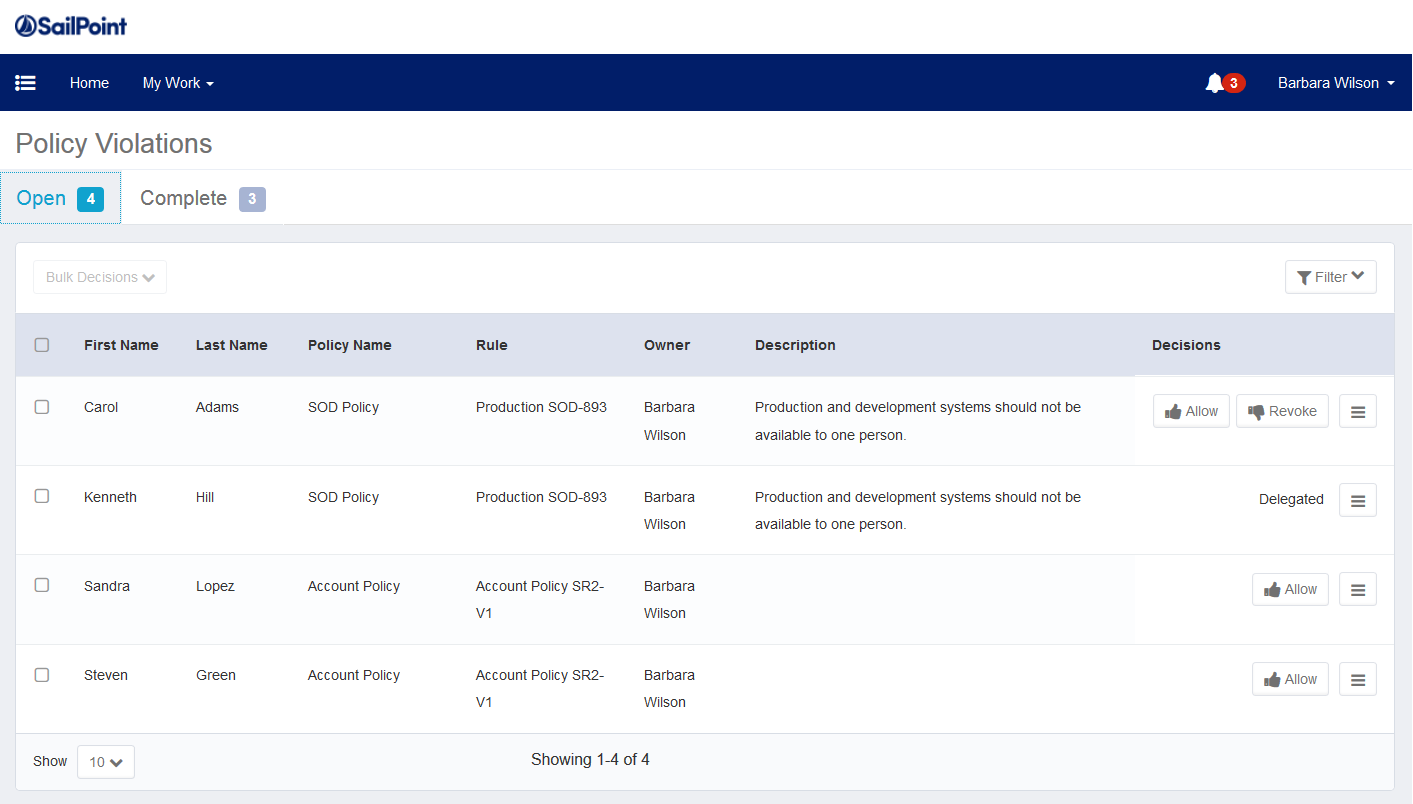
- The Open Tab shows open policy violation items awaiting your attention, as well as any items that have been delegated or certified. You can take all remediation actions (allow, delegate, revoke, certify) from this tab. Note that the actions available to you will depend on specifics such as Compliance Manager settings and policy violation rules, as well as on your role within IdentityIQ.
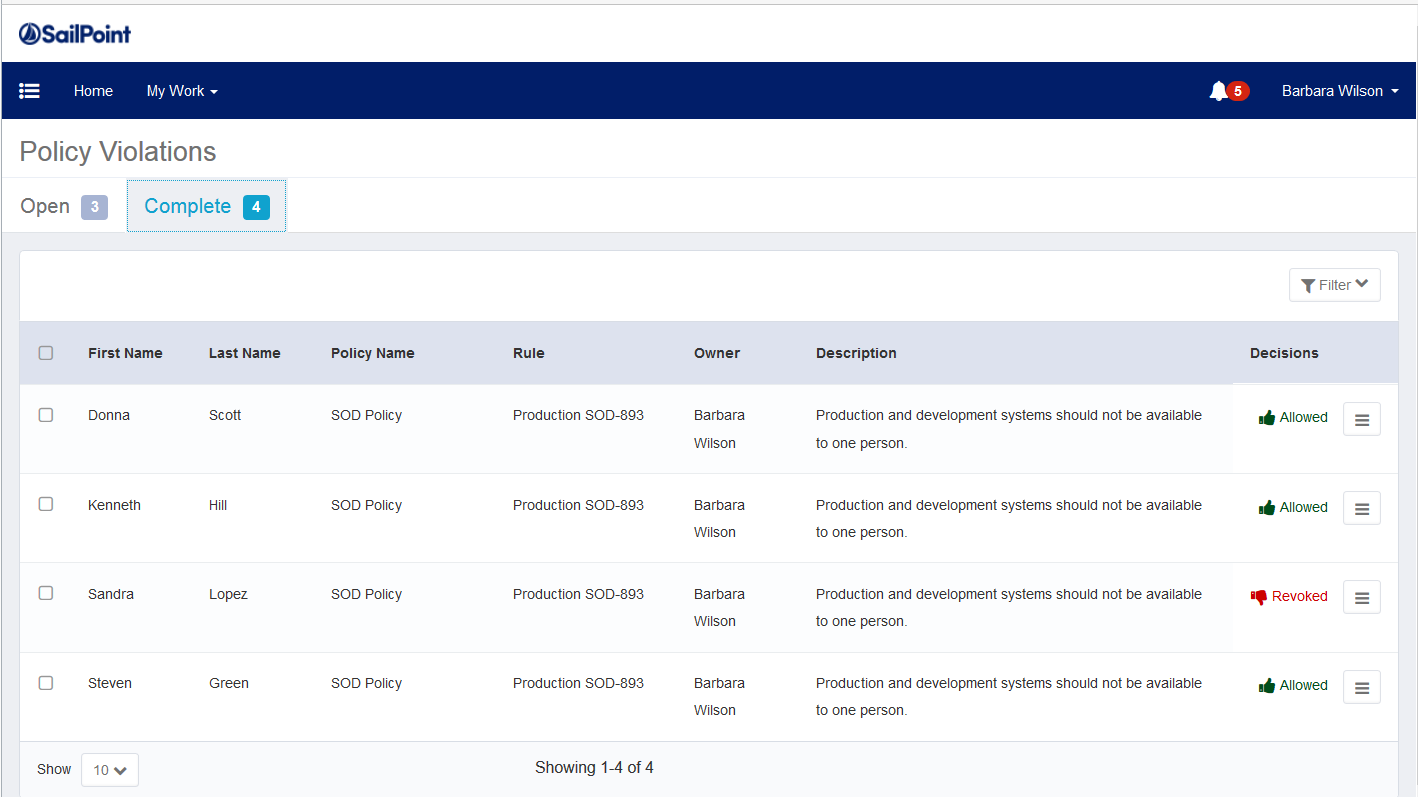
- The Complete Tab shows the policy violation items that you have completed (items that are allowed or revoked). You can allow, delegate and revoke from this tab; in addition you have options to edit approvals, and to review decision details. Note that delegated items stay in the Open tab, even if they are delegated from the Complete tab.
How To
Allow a violation item
Allowing (or mitigating) a violation means you are setting a time period in which the identity is allowed to work in violation of the policy, without affecting compliance or risk.
- Choose Allow for the violation(s):
- You can allow violations individually by clicking the Allow button next to a violation.
- You can also allow multiple violations by checking all the violations you want to allow. You can check sets of items individually, or check the top box then select all violations on the current page, or in the entire list. Then choose Allow from the Bulk Actions menu.
- In the Allow Violations dialog, specify a date on which this exception will expire; this is the date on which the violation will reappear in this list and in certifications. You must also add a comment explaining the mitigation decision before you can complete the Allow action.
IMPORTANT: In order for the reviewer to be able to select a specific Allow Until date, the Allow Enable Exception Popup option must be selected in the Compliance Manager global settings. Unless this option is enabled, the Allow option will use the Default Duration for Exceptions (default: one month) that is set in the Compliance Manager global settings, and will not allow the reviewer to modify the date.
To set this option globally, click the gear menu > Compliance Manager, then check the Enable Allow Exceptions Popup option, which is in the Decisions section. Be sure to save your changes when you modify this selection.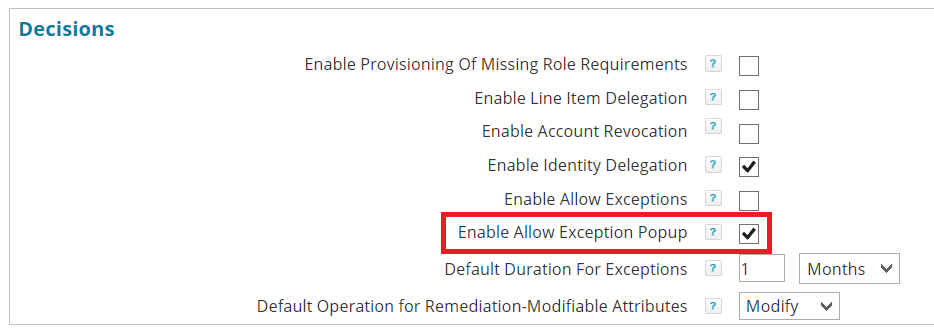
- Save your decision(s).
Correct/revoke a violation item
Separation of Duties policy violations are the only policy violations that can be corrected by revoking conflicting entitlements or roles in the Policy Violations UI.
In IdentityIQ 7.1 and earlier you used an option called Correct Violation from the Violation Decision menu on the details page for an individual violation. In IdentityIQ 7.2 the button for this is labelled Revoke and is available for relevant violations on the Open tab of the main Policy Violations page.
To correct a violation by revoking role(s) or entitlements(s):
- Click the Revoke button for the item.
- A dialog opens listing the entitlement(s) or role(s) that violate the policy. Choose the entitlement(s) or role(s) to remove, and click Revoke.
- Enter a comment and click Revoke again.
- Save your decision.
Certify a violation item
Only system administrator users can certify based on policy violations. The Certify option is, as of release 7.2., available only as a Bulk Decision.
- On the Open tab, select the identities (via checkbox) to certify
- From the Bulk Actions menu, choose Certify
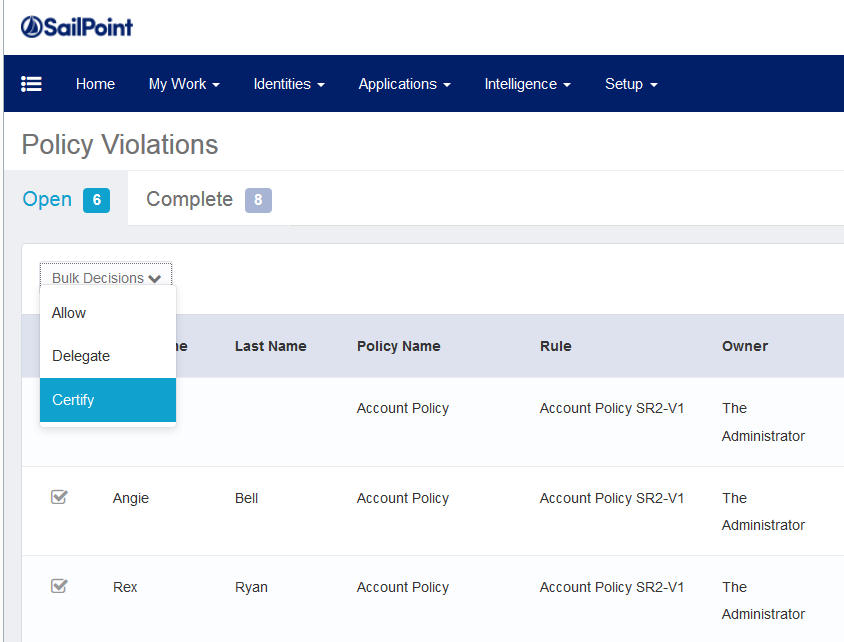
- IdentityIQ opens the Certification page; follow your organization’s certification procedures to schedule and run the certification.
Delegate a violation
The ability to delegate a violation must be enabled in the Compliance Manager setup page (as described below) in order for users to be able to delegate policy violations. You can delegate policy violations that are both on the Open tab and on the Complete tab.
- Check the item(s) to delegate.
- Choose Delegate:
- If you are on the Open tab, you can either click the three-line ("hamburger") icon next to the item and choose Delegate, or select multiple items and choose Delegate from the Bulk Actions menu.
- If you are on the Complete tab, click the three-line ("hamburger") icon next to the item and choose Delegate.
- In the dialog box that opens, specify the recipient and enter comments; there may be other specific informational fields in this dialog, based on the type of violation. Click Delegate.
- Save your decision(s).
Delegated items are always displayed on the Open tab. An item delegated from the Complete tab will move to the Open tab. Delegated items are marked as such on the Open tab.
Note: Delegated items appear in the recipient's Work Items menu (My Work > Work Items), not in the Policy Violations UI.
Enable or disable delegation of policy violation items
System administrators can enable or disable the delegation of policy violation items.
- Click the gear menu > Compliance Manager
- In the Decisions box, check or uncheck Enable Line Item Delegation
- Save your changes.
Edit a decision
You can edit decisions from the Complete tab after a you allow a violation. Click the three-line ("hamburger") menu and choose Edit Decision. Note that revocation decisions can not be edited here; they can only be viewed.
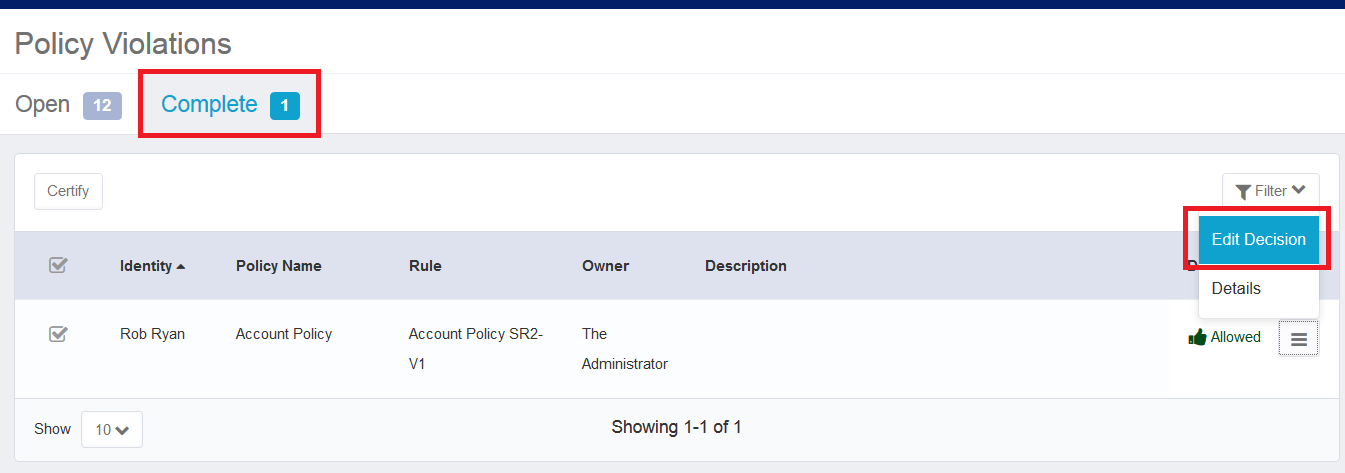
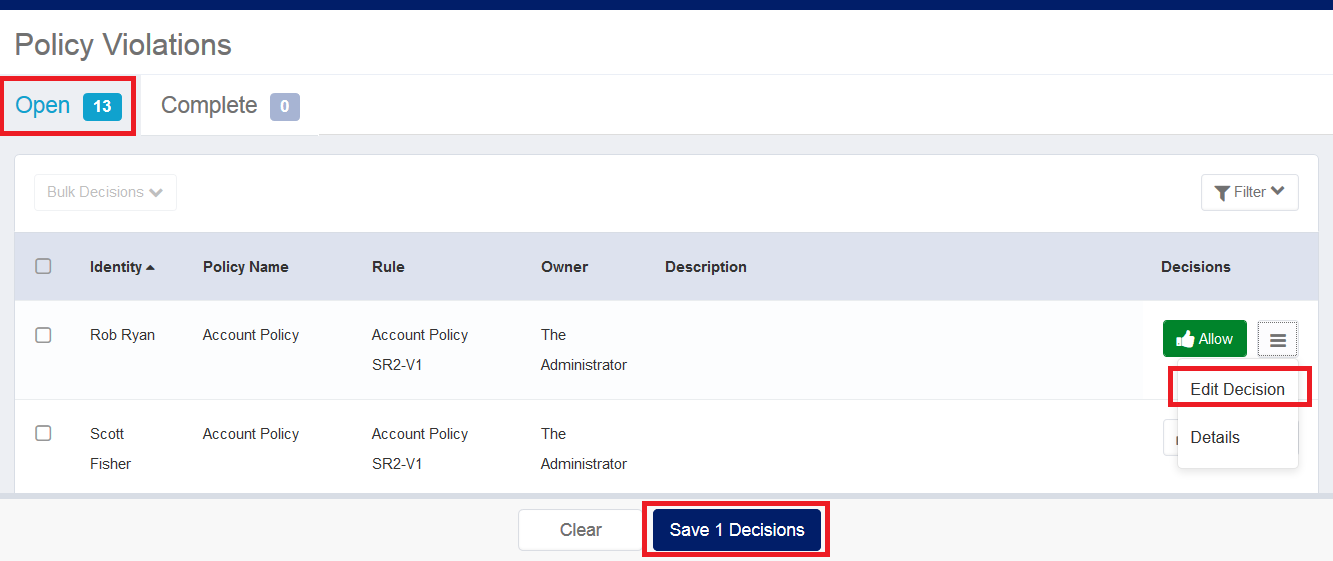
You can also edit a decision on the Open tab after you make the decision, but before you save the decision. When you have clicked Allow or Revoke for a violation item, an Edit Decision option becomes available in the three-line ("hamburger") menu. Note that once you save your decision(s), this Edit Decision option is no longer available in the Open tab.
Filter violation Items
- In the Open or Complete tab, click Filter, then set your criteria. You can filter by status, policy type, first name, last name, and identity.
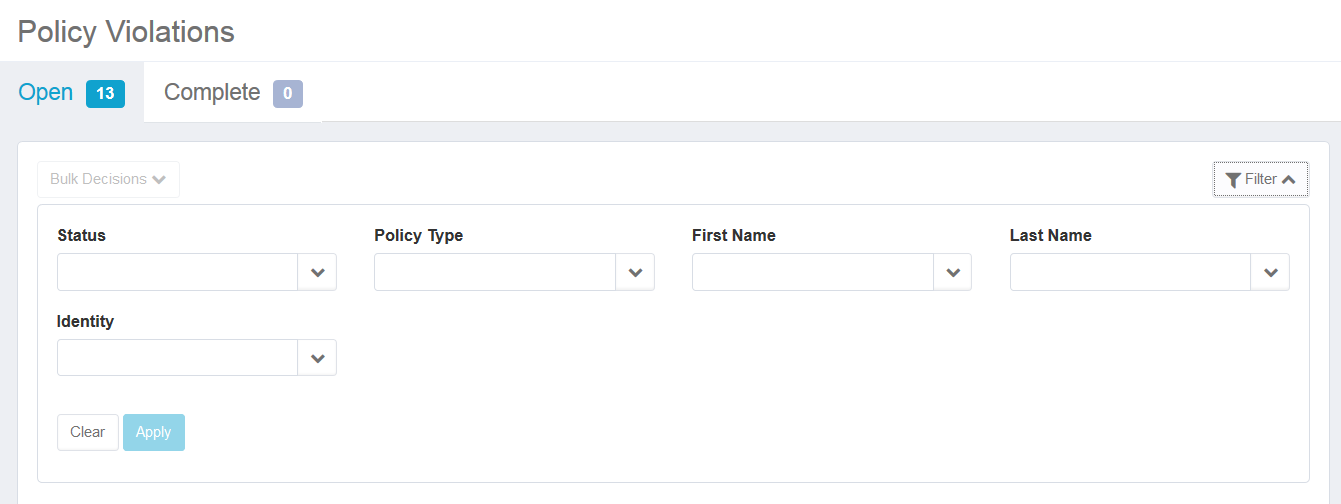
- Click Apply once your criteria is set, to filter your displayed items.The filter button turns green when filtering is applied, to alert you that you are seeing a filtered set of items in your list.
- To clear your filtering criteria and return to viewing all items, open the Filter area and click the Clear button
- Mark as Read
- Mark as New
- Bookmark
- Permalink
- Report Content to Moderator
Helpful Info. Have got 2 quick questions:
1. If we need to programmatically trigger the identity certification when VO clicks on Certify. How can we achieve this. We have all disconnected type applications.
2. On revoke, I am seeing a pop-up where VO has to choose the remediator, how can I restrict that pop-up.
,
Thanks
Sourabh
- Mark as Read
- Mark as New
- Bookmark
- Permalink
- Report Content to Moderator
1. Can we delete Completed items in Complete Tab?
2. Can we delete/refresh old items in both the tabs?
- without using debug.
Because I am facing issue in this scenario:
User has A - B has conflict , Action taken B revoked . (this item is in completed tab)
now new C assigned and A-C also have conflict
but it is not detected. When I deleted the old completed item from debug. It got detected.
Please help!! (using 8.0p1)
- Mark as Read
- Mark as New
- Bookmark
- Permalink
- Report Content to Moderator
Re: neetikam
For 1. I believe you need to uncheck "Keep Previous Violations" from your Identity Refresh task where you are checking for Active Policies
- Mark as Read
- Mark as New
- Bookmark
- Permalink
- Report Content to Moderator
How is the 'Allowed' and 'Revoked' status in the completed tab set ?
What property is it based out of ?
We are moving the violation items to completed tab and via custom code(by changing status on the violation item) but it is not showing 'Allowed' or 'Revoked' status on UI.
Can someone help ?
