fact_check
IdentityNow
Onboarding Readiness Checklist
This tool is designed to walk you through the onboarding readiness checklist for implementing IdentityNow. Diligently completing each item in this checklist will ensure that you and your project team are ready to begin implementing your IdentityNow instance, and can progress through your project plan with minimum delay.
For more information on how to complete this checklist, please view the following video: https://videos.sailpoint.com/watch/Zy2An77Na9rGGsUMR8CvnG?second=0
Should you have any questions or need clarification on any of the recommended tasks below, please reach out to your SailPoint implementation team. In the event that you do not have an implementation project with SailPoint or an approved partner, you can contact your SailPoint Customer Success Manager to obtain guidance.
IdentityNow Onboarding Readiness Checklist
Your Onboarding team wants to ensure you're prepared for your IdentityNow implementation. This checklist guides you through the necessary steps to set you up for success!
Click on the panel headings to show or hide the details for each step and use the information provided to quickly identify the action items your team should undertake to configure your IdentityNow tenant.
SailPoint Community Resources
Use the Compass Community to search SailPoint functionality, ask questions, and read about best practices that can help you deploy your product. In addition to joining the community, we also strongly encourage you to bookmark the Documentation Site, Developer Portal and Support Portal, as well as explore all of the other resources that SailPoint offers.
SailPoint and IdentityNow Training
SailPoint Identity University provides you with the technical training needed to optimize your productivity and successfully implement your identity security solution. It is important for members of the implementation and management teams to take these courses. You will become more familiar with the concepts and activities covered during onboarding and gain the basic knowledge needed to maintain your identity program.
Virtual Appliances
Important Note: The Virtual Appliance discussion below is geared towards customers who are interested in deploying their appliances on their own with minimal SailPoint involvement. However, we encourage customers to reach out to their SailPoint Customer Onboarding Manager if they have any questions, concerns, or issues following any of the steps outlined below.
In order to securely communicate with your organization's systems, SailPoint leverages a Virtual Appliance (VA) as the connectivity gateway between the IdentityNow cloud platform and your on-premise applications. Please note that even your cloud applications would be considered "on-premise" because they are private clouds reserved for use only by your organization.
Because the VA is a Linux-based virtual machine that is provided as a virtual disk image, your organization is responsible for procuring the hardware or hypervisor necessary to host that image. Your organization also needs to ensure proper connectivity to the cloud for the VA to operate. SailPoint will manage the rest of the responsibilities: monitoring, maintenance, patching and upgrading of the virtual machine's software itself.
For full documentation on the VA, including links to troubleshooting documentation, please consult the Virtual Appliance Reference Guide in Compass.
| Minimum Requirements | Recommended Requirements | vSphere Installation Guide |
|---|---|---|
| Processor: 1 Memory: 8 GB Storage: 128 GB vSphere 6.5+ |
Processors: 2 Memory: 16 GB Storage: 128 GB vSphere 6.5+ |
Installation Guide for vSphere |
| Minimum Requirements | Recommended Requirements | Hyper-V Installation Guide |
|---|---|---|
| Processor: 2 Memory: 16 GB Storage: 128 GB Microsoft Hyper-V Server 2016, Windows Server 2016 |
Processors: 4 Memory: 32 GB Storage: 128 GB Microsoft Hyper-V Server 2016, Windows Server 2016 |
Installation Guide for Hyper-V |
| Minimum Requirements | Recommended Requirements | AWS Installation Guide |
|---|---|---|
| m4.xlarge | m4.xlarge | Installation Guide for AWS |
| Minimum Requirements | Recommended Requirements | Azure Installation Guide |
|---|---|---|
| Standard_B4ms | Standard_B4ms | Installation Guide for Azure |
| Minimum Requirements | Recommended Requirements | GCP Installation Guide |
|---|---|---|
| Processor: 2 Memory: 16 GB Storage: 128 GB |
Processor: 4 Memory: 32 GB Storage: 128 GB |
Installation Guide for GCP |
Standard Deploy
In the standard deploy configuration, all outbound connections are allowed on HTTPS port 443. This is the default option and is the recommended
configuration for faster deploys with less configuration needed.
For the standard deploy option, you will want to ensure that the proper firewall ports and/or destination whitelist URLs are opened on your end to ensure
connectivity to IdentityNow and SailPoint's cloud management infrastructure:
| Networking Requirements | |
|---|---|
| Ports |
|
| URLs |
|
| Region-Specific URLs | Please note that you must always allow the primary AWS S3 URL listed above, as well as the us-east URL for each of the below, even if your
region is located elsewhere:
|
Please reference the Standard Deploy guide for instructions on how to set up this configuration.
Proxy Server Deploy
In the proxy server configuration, all outbound connections are routed through an existing on-premise proxy server prior to contacting cloud services. This option is
recommended if your organization requires all external traffic to first go through edge routers or other secure infrastructure.
For the proxy deploy option, you will want to ensure that the proper firewall ports and/or destination whitelist URLs are opened on your end to ensure
connectivity to IdentityNow and SailPoint's cloud management infrastructure:
| Networking Requirements | |
|---|---|
| Ports |
|
| URLs |
|
| Region-Specific URLs | Please note that you must always allow the primary AWS S3 URL listed above, as well as the us-east URL for each of the below, even if your
region is located elsewhere:
|
Please reference the Proxy Server guide for instructions on how to set up this configuration.
Secure Tunnel Deploy
When using the secure tunnel deploy configuration, all outbound connections are routed through SailPoint's secure tunnel servers within Amazon Web
Services prior to connecting to cloud services. This option is recommended if your organization is required to add outbound traffic to the "allow"
list and your firewall does not support domain entries.
Please reference the
Secure Tunnel
guide for instructions on how to set up this configuration.
All VAs Running
When all VAs are configured to be running, all virtual appliances are deployed in a single cluster with all VAs running concurrently. Some VAs are in the primary datacenter, and others (called DR VAs) are deployed in a "disaster recovery" datacenter.
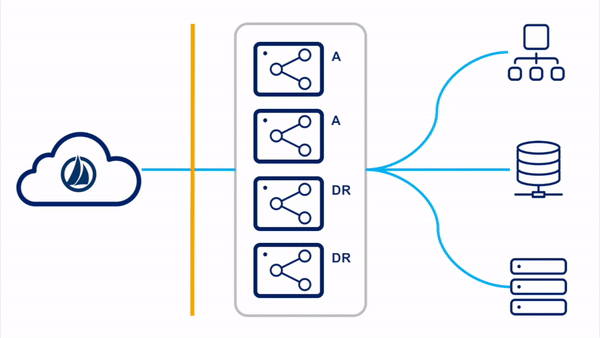
Please reference the
All VAs Running
section of the High Availability and Disaster Recovery guide for more information on this configuration.
Switched Clusters
In the switched clusters strategy, two virtual appliance clusters are deployed in the tenant. One VA cluster is the "primary" VA cluster, with all member VAs in the primary datacenter. The other VA cluster is the "DR" VA cluster, with all member VAs in the backup disaster recovery datacenter. All VAs in all clusters are powered on and receiving updates.
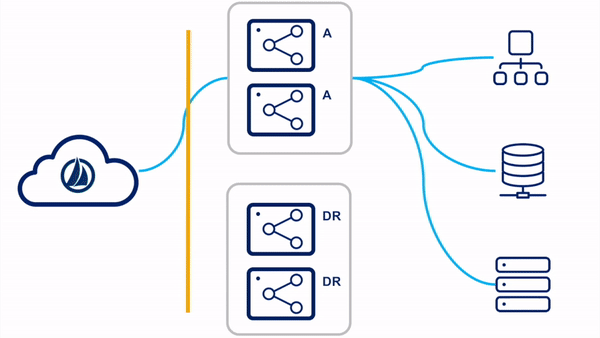
Please reference the
Switch Clusters
section of the High Availability and Disaster Recovery guide for more information on this configuration.
Standby Reactive
For the standby reactive configuration, the primary virtual appliances are deployed in a single VA cluster. Only the VAs in the primary datacenter are running concurrently. There are existing standby VAs set up and tested in a disaster recovery zone, but not yet deployed to a VA cluster. These VAs can be left powered up or down, though SailPoint highly recommends powering them up periodically so that they can receive any updates that might have been published since the last time they were connected.
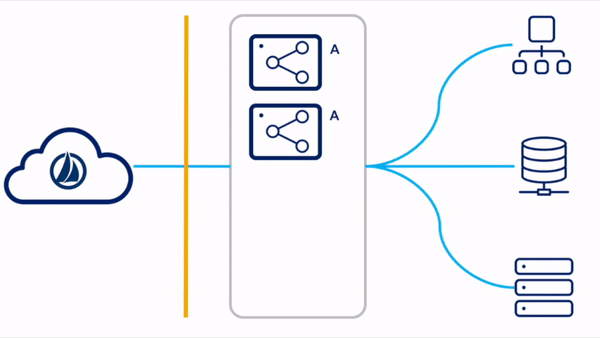
Please reference the
Standby Reactive Deployment
section of the High Availability and Disaster Recovery guide for more information on this configuration.
IQService for Active Directory
Note: IQService does not apply to CSD Portfolio customers. This step may be skipped.
If provisioning/writing to Active Directory or Azure Active Directory is in scope for your project, you will need to install IQService on a server that is connected to the same domain as the AD domain you are interested in managing. IQService is a small, lightweight utility provided by SailPoint that leverages a combination of Active Directory Service Interfaces and PowerShell to execute write operations against your Active Directory domain controllers.
Please reference the installation guide for complete details. At a minimum, you will need to procure a server running Windows Server 2012 with .NET framework 4.5.2 installed, 250 MB free disk space, and 500 MB of RAM. Additionally, if you would like to leverage TLS for enhanced security (recommended), you will need to ensure that you have certificates from your trusted certificate authority which meet the below requirements:
- Subject and Subject Alternative Name of the certificate must match the fully qualified domain name of the host
- Certificate should have private key
- Certificate should have Enhanced Key Usage (EKU) as Server authentication with client authentication
- Certificate must be present in the Personal folder of the server from which it is being generated
For high availability/disaster recovery purposes, our customers often choose to install both a primary IQService host and a secondary IQService via a load balancer. If you would like to do this as well, it is important to note that the only supported "fallback" configuration is active-passive. In other words, one IQService instance must be considered the primary active host, and the second service should be configured on the load balancer as a passive service which is only invoked if the primary instance is unreachable.
Service Accounts for Sources in Scope
For each of the direct-connected target applications that are in scope for your project, you will need to request service accounts with the appropriate levels of permission to integrate with IdentityNow. You can use the form below to dynamically add sources to the table of reference articles which can be shared with your application owners.
The full list of supported connectors for IdentityNow can be found in Compass. If you're unsure which IdentityNow connector is appropriate for a given application, please reach out to your Customer Onboarding Manager.
| Target Application | Source Configuration Guide | Action |
|---|
Congratulations! You've completed all of the steps and are now ready to start onboarding.
Before you contact us, click the "Download" button below to generate a text file with your selections and save it locally. You can then share those answers with your implementation team. Once downloaded, you will see an form for sending your selections to SailPoint. This is entirely optional but, if you are working with SailPoint, clicking the "Submit" button on the form will share your answers with us directly.
Optionally, you can fill out the Setup Services Intake Form and include the IdentityNow Onboarding Readiness Checklist responses which you just downloaded. If you have any questions, please don't hesitate to reach out to your Customer Onboarding Manager or Customer Success Manager. We are so excited to start the next phase of the implementation journey with you!
Here are your answers in Markdown format:
Select all text in the window and copy/paste into your favorite text editor.