- Products & services Products & services
- Resources ResourcesLearning
- Learning
- Identity University Get technical training to ensure a successful implementation
- Training paths Follow a role-based or product-based training path
- SailPoint professional certifications & credentials Advance your career or validate your identity security knowledge
- Training onboarding guide Make of the most of training with our step-by-step guide
- Training FAQs Find answers to common training questions
- Community Community
- Compass
- :
- Discuss
- :
- Community Wiki
- :
- IdentityIQ Wiki
- :
- Using the IdentityIQ REST API with PowerShell
- Article History
- Subscribe to RSS Feed
- Mark as New
- Mark as Read
- Bookmark
- Subscribe
- Printer Friendly Page
- Report Content to Moderator
Using the IdentityIQ REST API with PowerShell
Using the IdentityIQ REST API with PowerShell
- Introduction
- A note about credentials
- Example 1 - Ping
- Script
- Output
- Example 2 - Getting a config item
- Script
- Output
- Example 3 - Getting a list
- Script
- Output
- Example 4 - Check a password via POST request
- Script
- Output
- Using a REST tool in the browser
- Example 5 - Calling a workflow and getting a result
- Script
- Companion workflow
- Output
- Conclusion and other resources
Introduction
This article is a walk-through on how to use Microsoft PowerShell to manipulate the IdentityIQ REST API.
Examples will show additional complexity with each iteration. The goal here is not to provide an exhaustive set of examples, but to show some recipes that can be extended upon.
The examples used here require PowerShell version 3.0+.
The IdentityIQ version used is 6.4p3, but other versions with the REST API will behave in a similar fashion. For the best information related to your specific IdentityIQ version, please refer to the included documentation.
Each example shows a part of a larger script (a function) designed to run several examples. The complete PowerShell script (ps1) is attached to this document as a reference. PowerShell ISE (the integrated scripting environment from Microsoft) was used to build and test all scripts.
There is also a sample workflow that can be imported for testing with example 5. Note this sample workflow is not intended for import into a production environment and should only be used for rudimentary testing.
A note about credentials
All calls to the REST API require a set of credentials (in these examples, passed with basic authentication). The "WebServices Exectuor" IdentityIQ permission is required to be assigned to an account (even spadmin does not have it by default) before it can make REST API calls.
In each example, credentials ($creds) are passed into the call - this is used by the following line to capture credentials to use with each part of the script calls:
#we will prompt once in the script so we can use creds with each rest call
$creds = Get-Credential
This can be altered to capture credentials in-line by using Get-Credential inside parenthesis:
Invoke-RestMethod -Uri "http://localhost:8080/iiq64/rest/ping" -Method Get -Credential (Get-Credential);
This article does not cover hard-coding credentials for use in PowerShell scripts.
There are several general examples on the Internet that demonstrate various use cases and they are beyond the scope of this article (and each company has differing opinions and requirements for how to use credentials in scripts).
Example 1 - Ping
Script
This is the most basic example, showing connectivity before moving onto more complex calls.
#ping to test connection - note the $creds passes in the IdentityIQ user/password already captured above
#****************************************************************************
function Run-Example1() {
$ping = $null;
$finalUrl = $baseURL + "/rest/ping";
$ping = Invoke-RestMethod -Uri $finalUrl -Method Get -Credential $creds;
#check our result (which is just a string)
if ($ping) {
Write-Host "ping successful - $ping";
} else {
Write-Host "ping failed";
Exit 1;
}
}
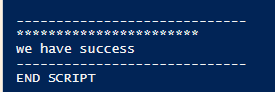
Output
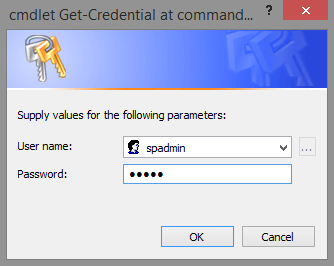
Credential pop-up shows to capture username/password to be sent in the web request. Note that in this example, spadmin has already been granted the rights to make REST API calls.
Here is the success message showing the ping succeed:

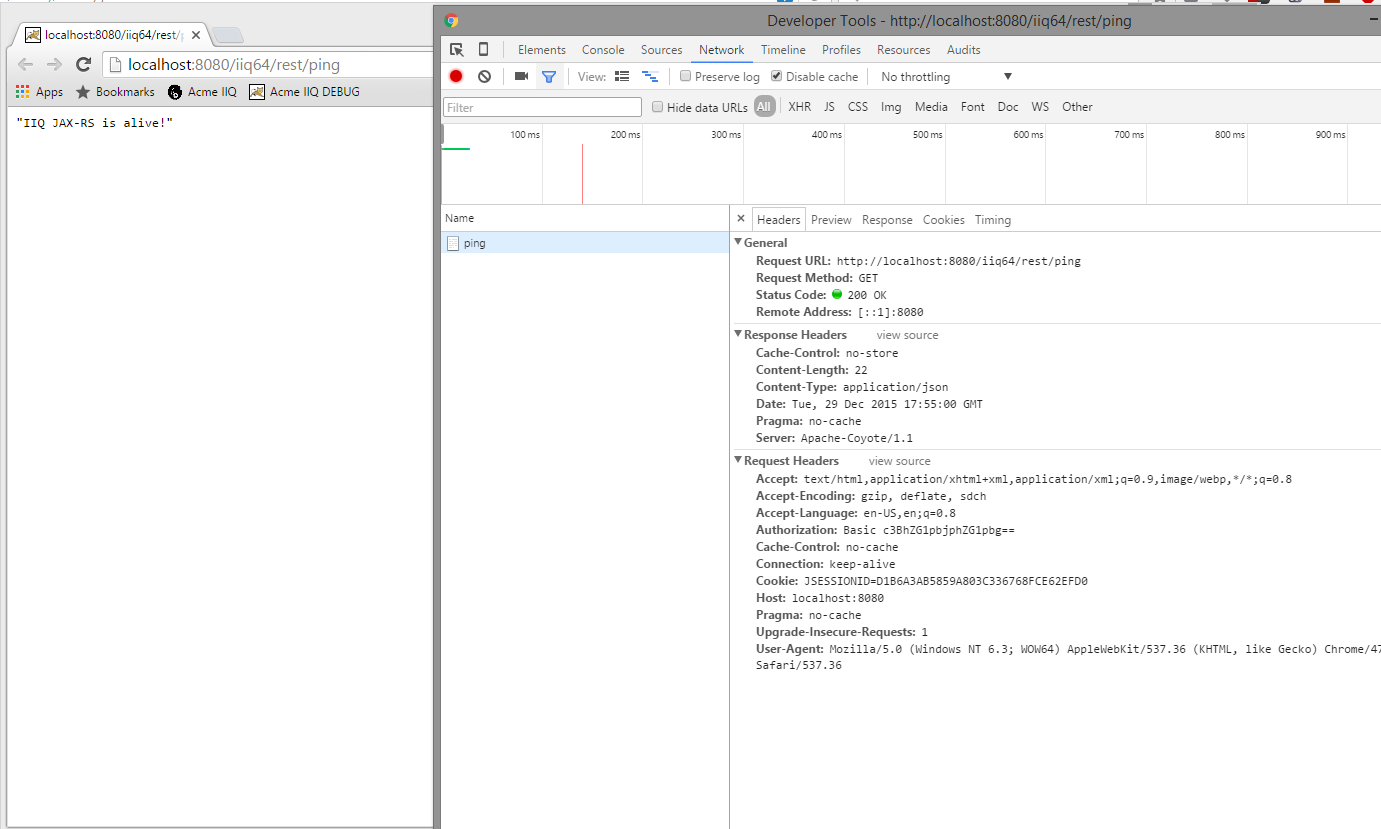
With a simple GET request like this, you can also go right to the browser for a basic test:

Showing more detail with Chrome developer tools:
Example 2 - Getting a config item
Script
This example demonstrates how to get an item and use the item's properties.
#get json back from checking config item - many individual settings
#****************************************************************************
function Run-Example2() {
$finalUrl = $baseURL + "/rest/configuration?attributeName=helpDeskRequestControls";
$helpDeskRequestControls = Invoke-RestMethod $finalUrl -Method Get -Credential $creds;
#check our result (which is json)
#note the json will be automatically converted to an object for powershell use!
$helpDeskRequestControls;
#we can check the members and object type by piping the object to get-member as shown:
Write-Host ***********************;
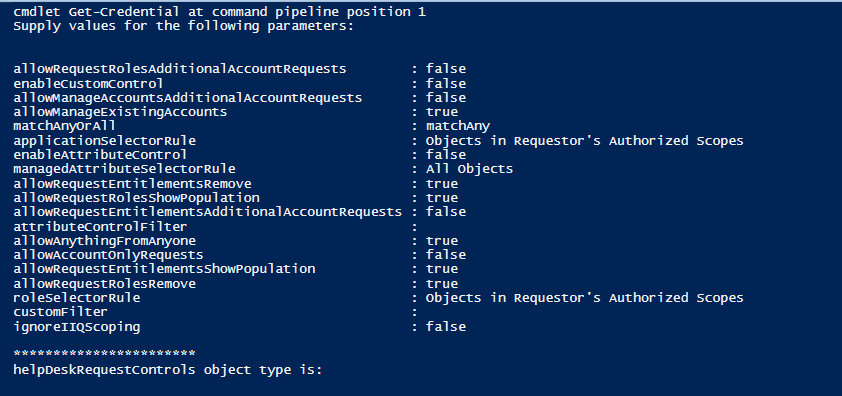
Write-Host "helpDeskRequestControls object type is:";
$helpDeskRequestControls | Get-Member | Format-Table;
Write-Host -----------------------------;
#we can then access the members like this:
Write-Host ***********************;
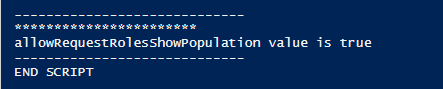
Write-Host allowRequestRolesShowPopulation value is $helpDeskRequestControls.allowRequestRolesShowPopulation;
Write-Host -----------------------------;
}
Output
The result comes back as PSCustomObject that provides properties we can access:
The PSCustomObject is a default way of PowerShell "objectifying" results (so they can be used in a object-oriented way).
The Get-Member | Format-Table part of the example script above shows the actual member breakdowns:
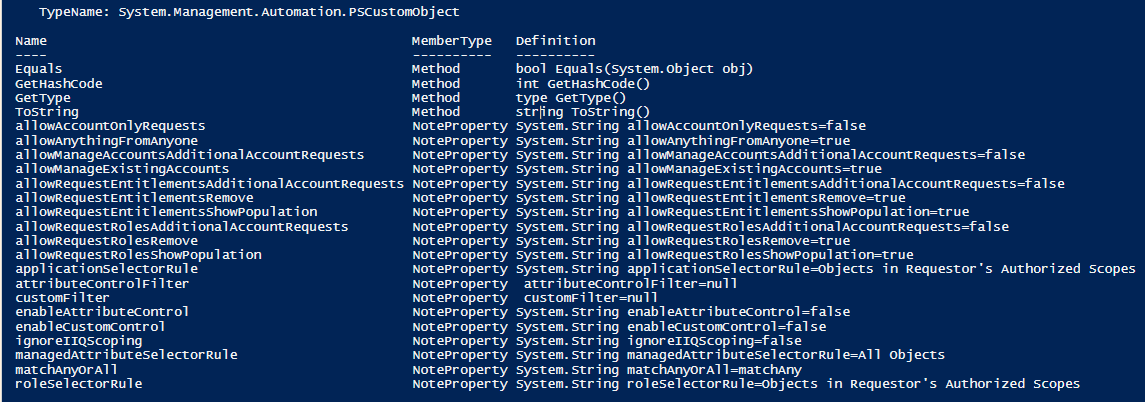
The last part of the example script in this section shows how to access a specific property - using dot (".") notation like you would with other objects in PowerShell. Here we get a specific property of our PSCustomObject instance.
Finally, compare the PSCustomObject members with the XML Artifact representation of the same object (got this from the debug page in IdentityIQ - an entry under SystemConfiguration) and notice the similarities:
<entry key="helpDeskRequestControls">
<value>
<Map>
<entry key="allowAccountOnlyRequests" value="false"/>
<entry key="allowAnythingFromAnyone" value="true"/>
<entry key="allowManageAccountsAdditionalAccountRequests" value="false"/>
<entry key="allowManageExistingAccounts" value="true"/>
<entry key="allowRequestEntitlementsAdditionalAccountRequests" value="false"/>
<entry key="allowRequestEntitlementsRemove" value="true"/>
<entry key="allowRequestEntitlementsShowPopulation" value="true"/>
<entry key="allowRequestRolesAdditionalAccountRequests" value="false"/>
<entry key="allowRequestRolesRemove" value="true"/>
<entry key="allowRequestRolesShowPopulation" value="true"/>
<entry key="applicationSelectorRule" value="Objects in Requestor's Authorized Scopes"/>
<entry key="attributeControlFilter"/>
<entry key="customFilter"/>
<entry key="enableAttributeControl" value="false"/>
<entry key="enableCustomControl" value="false"/>
<entry key="ignoreIIQScoping" value="false"/>
<entry key="managedAttributeSelectorRule" value="All Objects"/>
<entry key="matchAnyOrAll" value="matchAny"/>
<entry key="roleSelectorRule" value="Objects in Requestor's Authorized Scopes"/>
</Map>
</value>
</entry>
Example 3 - Getting a list
Script
This example gets json back like in example 2, but intentionally gets a configuration item that has a list as an attribute.
#get json back from checking config item - now something with a list
#****************************************************************************
function Run-Example3() {
$finalUrl = $baseURL + "/rest/configuration?attributeName=accessRequestTypes";
$accessRequestTypes = Invoke-RestMethod $finalUrl -Method Get -Credential $creds;
#check our result (which is json)
#note the json will be automatically converted to an object for powershell use!
$accessRequestTypes;
#we can check the members and object type by piping the object to get-member as shown:
Write-Host ***********************;
Write-Host "accessRequestTypes response object is:";
$accessRequestTypes | Get-Member | Format-Table;
Write-Host -----------------------------;
#we can then access the members like this:
Write-Host ***********************;
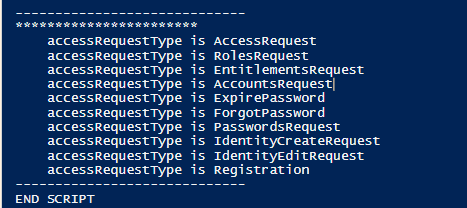
foreach ($item in $accessRequestTypes) {
Write-Host "`taccessRequestType is $item";
}
Write-Host -----------------------------;
}
Output
Iterating the list with the foreach loop in this example script gives us the items as shown:
Another browser example (since this is a simple GET request) shows the "raw" JSON response:

Much like in example 2, a configuration item is requested and returned as JSON. Here we have an additional attribute that is a list of values - observe the XML representation (taken from the debug page to compare):
<entry key="accessRequestTypes">
<value>
<List>
<String>AccessRequest</String>
<String>RolesRequest</String>
<String>EntitlementsRequest</String>
<String>AccountsRequest</String>
<String>ExpirePassword</String>
<String>ForgotPassword</String>
<String>PasswordsRequest</String>
<String>IdentityCreateRequest</String>
<String>IdentityEditRequest</String>
<String>Registration</String>
</List>
</value>
</entry>
Example 4 - Check a password via POST request
Script
This example switches to the POST request style to demonstrate how to accomplish more complex requests.
PowerShell can make the JSON body for us utilizing the hashtable syntax - @{}.
#now we will do something a little more complicated - we want to check a password against a password policy
#in this case, we can't simply use a get - we must post instead - note the use of the "body" and method "post"
#****************************************************************************
function Run-Example4() {
#create hash table of params that are required (per "REST API Integration" guide)
$body = @{
id='spadmin'
password='admin'
}
#convert hash table to json for post body
$jsonBody = ConvertTo-Json -InputObject $body
$finalUrl = $baseURL + "/rest/policies/checkPasswordPolicies";
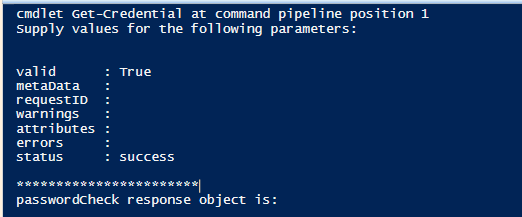
$passwordCheck = Invoke-RestMethod $finalUrl `
-Method Post -Credential $creds -Body $jsonBody -ContentType "application/json";
#check our result (which is json)
#note the json will be automatically converted to an object for powershell use!
$passwordCheck;
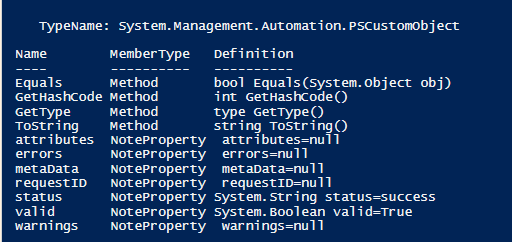
#we can check the members and object type by piping the object to get-member as shown:
Write-Host ***********************;
Write-Host "passwordCheck response object is:";
$passwordCheck | Get-Member | Format-Table;
Write-Host -----------------------------;
#we can then access the members like this:
Write-Host ***********************;
Write-Host we have $passwordCheck.status;
Write-Host -----------------------------;
}
Output
Output is as follows:
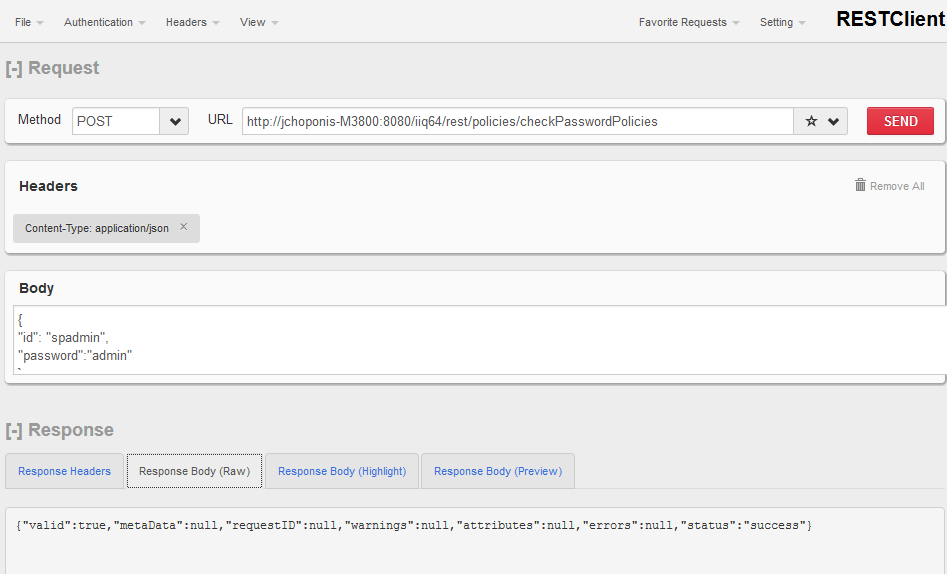
Using a REST tool in the browser
To test this another way, one can use a REST API test tool (since this is a POST request, another tool makes this easier). This is an example using RESTClient in FireFox.
Note the similarities shown in the "raw" response here and the PowerShell-groomed response above.
Example 5 - Calling a workflow and getting a result
Script
The final example in this series shows how to call a workflow and get back a response from that workflow - this case assumes the workflow performs some kind of immediate action and can provide an immediate response. Note that Invoke-WebRequest has been used here in lieu of Invoke-RestMethod.
Note the sample workflow (attached) needs to be imported before this example can work.
#now we will call a workflow and look for a result (payload) back
#i'm using a junk sample workflow that simply echoes back a string that includes the "key" arg passed up
#note you have to import the sample workflow xml for this to work
#****************************************************************************
function Run-Example5() {
#create hash table of params that are required (per "REST API Integration" guide)
#this simulates an arg you may want to pass in
$body = @{
workflowArgs=@{
key='myInput123'
}
}
$WorkflowName = "AAATestWorkflow";
#convert hash table to json for post body
$jsonBody = ConvertTo-Json -InputObject $body
Write-Host "jsonBody is $jsonBody";
#encode workflow name for web
$encodedWorkflowName = [System.Web.HttpUtility]::HtmlEncode($WorkflowName);
Write-Host "encoded workflow name is $encodedWorkflowName";
$finalUrl = $baseURL + "/rest/workflows/" + $encodedWorkflowName + "/launch";
Write-Host "final url is $finalUrl";
#$operation = Invoke-RestMethod $finalUrl -Method Post -Credential $creds -Body $jsonBody -ContentType "application/json";
#note that i swapped to invoke-webRequest here - restMethod and webRequest are essentially the "same" but for some reason,
#invoke-RestMethod for getting workflow output leaves you high-and-dry - using webRequest seems to fix that shortcoming and
#you get the "proper" payload (if any) back from the workflow (i.e. the attributes arg in the returned JSON).
$operation = Invoke-WebRequest $finalUrl -Method Post -Credential $creds -Body $jsonBody -ContentType "application/json";
#$reader = New-Object System.IO.StreamReader($operation)
#$results = $reader.ReadToEnd();
#check our result (which is json)
#note the json will be automatically converted to an object for powershell use!
Write-Host Result is:
Write-Host $operation;
}
Companion workflow
The workflow being invoked by this script is very simple - the XML artifact is shown here - notice the "payload" attribute.
<?xml version='1.0' encoding='UTF-8'?>
<!DOCTYPE Workflow PUBLIC "sailpoint.dtd" "sailpoint.dtd">
<Workflow explicitTransitions="true" name="AAATestWorkflow" type="">
<Variable name="payload" output="true"/>
<Variable input="true" name="key"/>
<Step icon="Start" name="Start" posX="67" posY="354">
<Transition to="Delete"/>
</Step>
<Step icon="Provision" name="Delete" resultVariable="payload">
<Script>
<Source>
//this workflow is for demo purposes only. USE AT YOUR OWN RISK
return "Here is your response now " + key;
</Source>
</Script>
<Transition to="Stop"/>
</Step>
<Step icon="Stop" name="Stop" posX="509" posY="351"/>
</Workflow>
Output

Conclusion and other resources
In summary, PowerShell is a very-capable REST API tool and can be used in a number of ways to support automation that requires action against the IdentityIQ REST API.
The only oddity encountered in this set of examples is that Invoke-RestMethod does not return expected results when used in example 5. Invoke-WebRequest must be used instead - both have very similar function. For the limited use cases in this article, they are essentially interchangeable.
General guide from Microsoft on PowerShell scripting: Scripting with Windows PowerShell
The whitepaper for the REST API is found here: REST API Integration
You can find examples for using the IdentityIQ REST API with Java here:
