Classifications in IdentityIQ
- About classifications
- Where classification data comes from
- Assigning classifications to roles and entitlements
- Classification task for File Access Manager classifications
- How the File Access Manager classification task works
- Configuring the File Access Manager classification task
- Adding classifications to roles
- Adding classifications to entitlements
- Working with classifications in IdentityIQ
- Classifications in access requests
- Enabling or disabling classification visibility in access requests
- Classifications in access approvals
- Classifications in certifications and access reviews
- Setting a global default for showing classifications in certifications
- Showing classifications in individual certifications
- Including classifications as criteria for what to certify
- Classifications in policies
- Searching for classifications on roles and entitlements
- Classification data in identities
- For more information
- Sample classification XML
About classifications
Classifications let you flag and categorize roles and entitlements, to help ensure the security and integrity of your access governance practices. Classifications can alert you when requesting, granting, or approving a user’s access will give that user access to sensitive, protected, or otherwise significant data.
In IdentityIQ, classifications are typically used to flag access to sensitive data, such as financial, personal, or health-related information, but you can use classifications to identify any kind of access your business needs to pay special attention to.
Classifications can be used in certifications and policies, to help you monitor and control the access your users have to sensitive data. You can configure access requests, approvals, and access reviews to show a classification icon with any role or entitlement that grants access to sensitive data, so that the users responsible for making access decisions can quickly and easily see which entitlements allow potentially risky access.
Where classification data comes from
IdentityIQ’s classification functions are designed to integrate with SailPoint’s File Access Manager module, to provide robust and seamless governance of sensitive data.
You can also implement classifications using data from other sources than File Access Manager, to tailor your classifications solution to your particular business needs. You can also use IdentityIQ's debug pages to create classifications directly in IdentityIQ.
A sample classification XML is provided at the end of this article.
Assigning classifications to roles and entitlements
For File Access Manager classifications, classifications are assigned to roles and entitlements by running a task. Classifications from other sources can be assigned to roles and entitlements manually.
Classification task for File Access Manager classifications
A new task in IdentityIQ version 8.1 handles the work of retrieving classification data from File Access Manager and assigning it to roles and entitlements in IdentityIQ: the File Access Manager classification task. Classifications from File Access Manager are managed as attributes on group and role entitlements. Classifications are correlated to roles and entitlements in IdentityIQ using either the correlation logic defined in the applications that aggregate account and group data, or custom rule logic.
Important: To use the File Access Manager classification task, you first have to configure a connection between IdentityIQ and File Access Manager. Details on how to configure this connection are in the IdentityIQ Version 8.1 System Configuration Guide.
How the File Access Manager classification task works
To give an overview of how the File Access Manager classification task works, we will use Active Directory as an example:
In our example, a user has Active Directory account, and the Active Directory account has membership in an Active Directory group. The Active Directory group grants access to various folders, some of which contain classified data. In other words, this Active Directory group grants access to classified data, to any user in the group.
File Access Manager’s governance operations can identify the folders that have classified data, and which groups grant access to those folders. When IdentityIQ's File Access Manager classification task retrieves this information from File Access Manager, it correlates the Active Directory groups identified in File Access Manager with the corresponding Active Directory groups managed in IdentityIQ.
This correlation can be done in a simple manner by using a common correlation key in the Active Directory application’s group schema; or, if more sophisticated handling is needed, a custom rule can be written to manage the correlation.
The File Access Manager classification task takes classification data that is recorded in File Access Manager at the folder level, and marks it in IdentityIQ on the Active Directory group that has access to that folder, so that access to classified data can be governed according to IdentityIQ's governance model.
Important: If your organization uses roles in your IdentityIQ implementation, you may also want to associate the classifications with your roles, so that roles which contain classified groups get marked as classified roles. To do this, you will also need to run an Effective Access Index task after running the File Access Manager classification task, to assign classification data to roles.
To Define Correlation Logic in an Application Definition:
These steps assume that you have already defined an application to correlate account and group data, such as an Active Directory application.
-
Click Applications > Application Definitions
-
Open the application that correlates accounts and groups
-
In the application's Group Schema, set the attribute you want to use for correlating File Access Manager classifications to IdentityIQ groups and roles as the correlation key. In Active Directory applications, this is typically the MsDs-PrincipalName attribute.
-
Save your changes to the application definition
-
Click gear menu > Global Settings > File Access Manager Configuration
-
In the Correlation Information for File Access Manager section, add the application you just updated to the SCIM Correlation Applications list.
-
Save your changes
-
Repeat these steps for each application you will use with File Access Manager classifications.
To Define Correlation Custom Rule Logic Globally
Handling correlation via a custom rule is typically used only when the correlation logic you can configure directly in your application definition does not meet your needs.
This step assumes that a custom BeanShell rule has been created to handle your custom correlation logic. For more information on developing rules, see the BeanShell Developer's Guide for IdentityIQ, particularly the Aggregation Rule Best Practices section.
- Click gear menu > Global Settings > File Access Manager Configuration
- In the Correlation Information for File Access Manager section, choose your rule from the SCIM Correlation Applications list
- Save your changes
Configuring the File Access Manager classification task
- Click Setup > Tasks
- Enter a Name for the task and set the standard task properties such as notifications, sign-off, and host, as you do for any other task.
- If you want to use a custom rule to handle correlation, choose it from the Classification Customization Rule. Custom rules are typically used only when the correlation logic you can configure directly in the application definition does not meet your needs. Rule must be of type ClassificationCustomization in order to be selectable in this UI.
- If your File Access Manager classification data includes descriptions, this is the locale they will be promoted to, by default
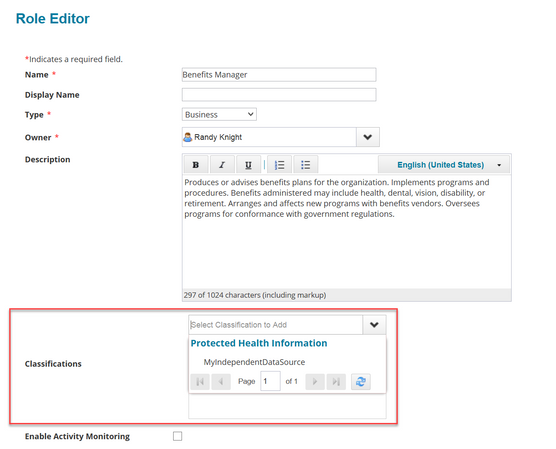
Adding classifications to roles
Classifications from sources other than File Access Manager can be assigned directly to roles in Role Management.
- Click Setup > Roles
- In the role viewer, select the role to edit
- Click Edit Role
- Choose the classification(s) to assign to the role.
- Save your changes.
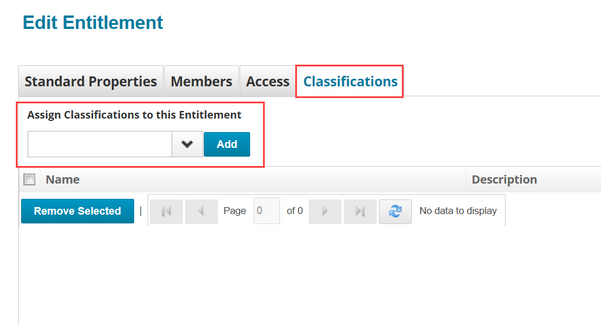
Adding classifications to entitlements
Classifications from sources other than File Access Manager can be assigned directly to entitlements in the Entitlement Catalog.
- Click Applications > Entitlement Catalog
- Select the entitlement to edit
- Click the Classifications tab
- Choose the classification(s) to assign to the entitlement and click Add for each
- Save your changes.
Working with classifications in IdentityIQ
Classifications can be used throughout IdentityIQ's compliance and lifecycle management features, to alert users when requesting, granting, or approving access will grant access to sensitive, protected, or otherwise significant data.
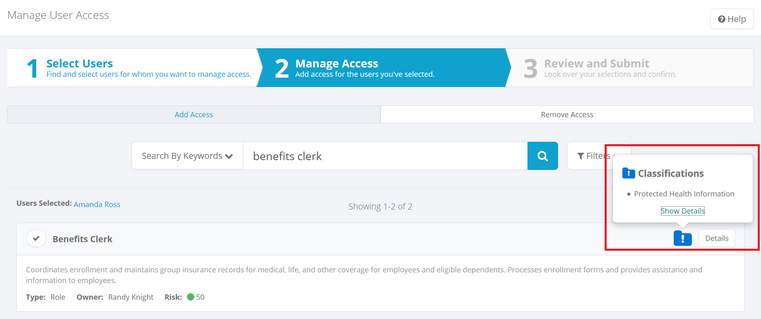
Classifications in access requests
The option to make classification flags visible in Access Requests is a configurable option. This option is provided so that you can choose whether or not to alert requesters to the fact that certain roles or entitlements will given them access to sensitive or protected data. Note that classification flags always appear in Access Approvals, regardless of the setting for Access Requests.
Enabling or disabling classification visibility in access requests
- Click the gear menu > Lifecycle Manager
- On the Configure tab, scroll to the Manage Classifications Options section
- Check the Display classifications in Access Request box
- Save your change
Classifications in access approvals
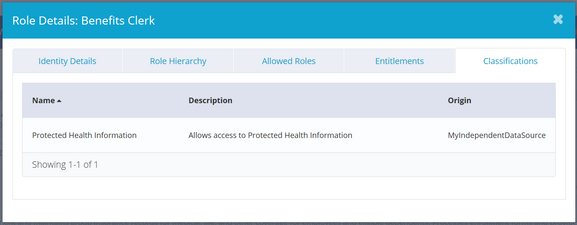
Users responsible for approving access can see classification information in the approval Ul. Click the classification icon to see details about the classification.
Click the Show Details link in the main Approvals UI to open a dialog with more details.
Classifications in certifications and access reviews
When you schedule a certification campaign, you can opt to show classification information the campaign’s access reviews. Classifications can be shown in Manager, Application Owner, Advanced, Role Membership, and Targeted certifications. You can also use classifications as a criterion for what to certify, in Targeted certifications.
Setting a global default for showing classifications in certifications
You can set a global default to show classifications for all your certification campaigns, and modify the default setting in any individual certifications you schedule
To set the global default for showing classifications in your certification campaigns:
- Click the gear menu > Compliance Manager
- In the Behavior section, use the Show Classifications checkbox to enable or disable showing classifications by default.
- Save your changes.
Showing classifications in individual certifications
To modify the global default behavior in an individual certification, check or uncheck the Show Classifications checkbox in the Schedule Certification page.
- In Manager, Entitlement Owner, Advanced, and Role Member certifications, this option is on the Behavior tab.
- In Targeted certifications, this option is in the Additional Settings section, under Advanced Options
Including classifications as criteria for what to certify
This option is available only in Targeted certifications:
- In the What to Certify section, click Filter Roles or Filter Entitlements
- Select Classifications as an attribute
- Choose an operator (Equals or Not Equals) and select your classification(s) from the drop-down
Classifications in policies
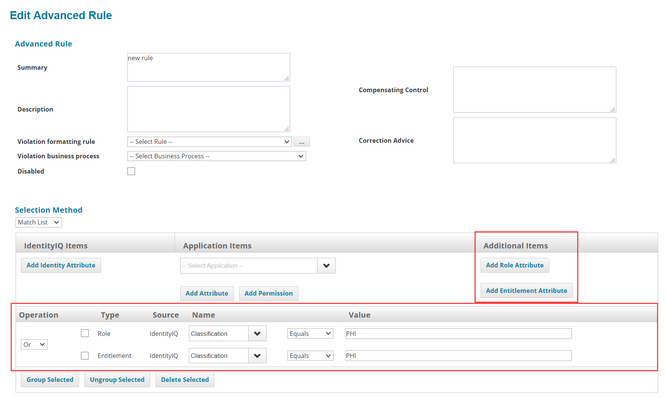
Classifications can be used in as rule criteria in Advanced policies.
- Click Setup > Policies
- Open an existing Advanced Policy, or click New Policy > Advanced Policy
- Click an existing rule, or click New Rule, to open the rule editor
- Use the Match List selection method
- Click Add Role Attribute or Add Entitlement Attribute
- Choose Classification as the name of the attribute; in the Value field, type the name of the classification. Names of classifications can be found in the Debug pages, in the relevant Classification object.
- Click Done
In this example, the policy will evaluate any role or entitlement with a "PHI" classification as a violation.
Searching for classifications on roles and entitlements
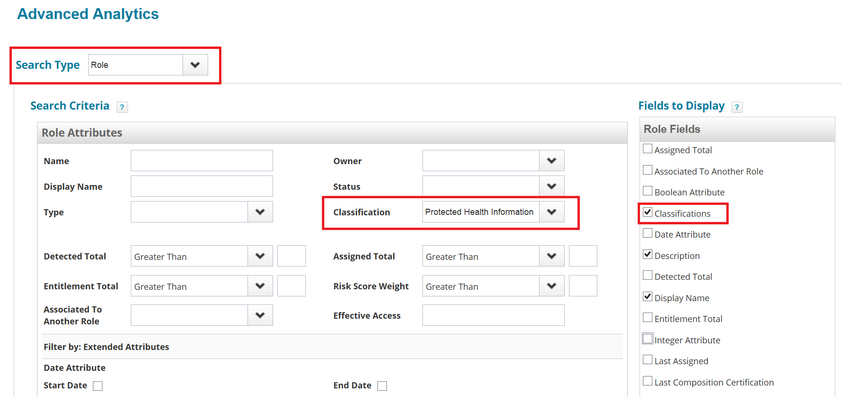
To see the roles and entitlements that have classifications assigned to them:
- Click Intelligence > Advanced Analytics
- Choose Role or Entitlement as the Search Type
- Choose the Classification to search on.
- Be sure to include Classifications in the Fields to Display in the search results.
- Click Run Search
Classification data in identities
In the Identity Warehouse, you can view classification flags on roles and entitlements for the identity, on the Entitlements tab.
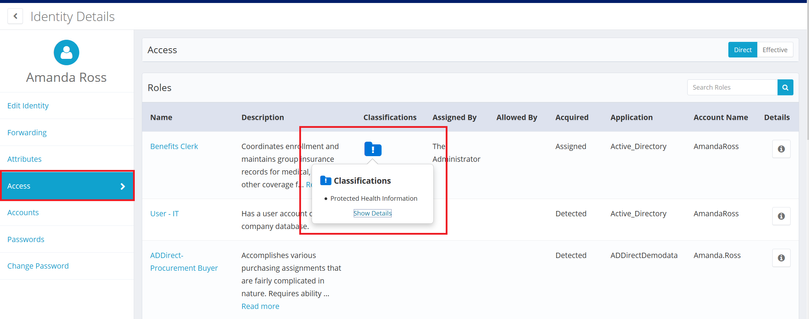
The Manage Identity feature also shows classifications for entitlements on identities.
- In the Quicklinks menu, click Manage Identity
- Choose Edit Identity or View identity
- Click on the identity; the Access panel for the identity shows a classification icon for any entitlements with classifications assigned.
- Click the classification icon for more details.
For more information
- For information in setting up classifications, see the IdentityIQ Version 8.1 System Administration Guide.
- For information on configuring the File Access Manager integration, see the IdentityIQ Version 8.1 System Configuration Guide.
- For more information on Classification options in specific features (such as Advanced Analytics, Certifications, and Policies), see:
Sample classification XML
If you plan to import classification data from a source other than File Access Manager, or create your own classification objects directly in the IdentityIQ Debug pages, this example of a classification object illustrates how to structure the XML.
<?xml version='1.0' encoding='UTF-8'?><!DOCTYPE Classification PUBLIC "sailpoint.dtd" "sailpoint.dtd">
<Classification id="" name="FinancialSensitive" displayName="Financials-Sensitive" origin="MyIndependentDataSource">
 <Attributes>
   <Map>
    <entry key="sysDescriptions">
     <value>
      <Map>
       <entry key="en_US" value="Allows access to sensitive financial data"/>
       <entry key="fr_FR" value="Permet l'accès à des données financières sensibles"/>
     </Map>
    </value>
   </entry>
  </Map>
 </Attributes>
</Classification><Classification id="" name="Privileged" displayName="Privileged Data" origin="MyIndependentDataSource">
  <Attributes>
  <Map>
    <entry key="sysDescriptions">
     <value>
       <Map>
      <entry key="en_US" value="Allows access to privileged data"/>
      <entry key="fr_FR" value="Permet l'accès à des données privilégiées"/>
     </Map>
    </value>
   </entry>
  </Map>
 </Attributes>
</Classification>
- Mark as Read
- Mark as New
- Bookmark
- Permalink
- Report Content to Moderator
Can we change/customize the classification icon?
- Mark as Read
- Mark as New
- Bookmark
- Permalink
- Report Content to Moderator
Can we have customization in the name of the classification and the icon?
- Mark as Read
- Mark as New
- Bookmark
- Permalink
- Report Content to Moderator
how to retrieve Entitlement classification or Role classification via API?
- Mark as Read
- Mark as New
- Bookmark
- Permalink
- Report Content to Moderator
Is it possible to have classifications that come from more than one application/connector?
So far, in my experience, the origin="<application name>" seems to restrict from using that classification across multiple applications for entitlements
- Mark as Read
- Mark as New
- Bookmark
- Permalink
- Report Content to Moderator
Hello - did anyone figure out how to customize the classification icon? Is there a way to mark High Risk access?
- Mark as Read
- Mark as New
- Bookmark
- Permalink
- Report Content to Moderator
What is the max number of classifications that IIQ will allow? I have been advised that if you have too many classifications it could affect the performance of IIQ.

