- Products & services Products & services
- Resources ResourcesLearning
- Learning
- Identity University Get technical training to ensure a successful implementation
- Training paths Follow a role-based or product-based training path
- SailPoint professional certifications & credentials Advance your career or validate your identity security knowledge
- Training onboarding guide Make of the most of training with our step-by-step guide
- Training FAQs Find answers to common training questions
- Community Community
- Compass
- :
- Discuss
- :
- Community Wiki
- :
- IdentityIQ Wiki
- :
- IdentityIQ 7.2: Custom Multi-factor Authentication Solution
- Article History
- Subscribe to RSS Feed
- Mark as New
- Mark as Read
- Bookmark
- Subscribe
- Printer Friendly Page
- Report Content to Moderator
IdentityIQ 7.2: Custom Multi-factor Authentication Solution
IdentityIQ 7.2: Custom Multi-factor Authentication Solution
DISCLAIMER: This documentation in no way intends to override product documentation but an endeavor to supplement it with more information gathered while doing some related proof-of-concepts to understand product capability better so that others can find it useful. The code attachment shared herewith does not disclose any sensitive data pertaining to my employer or customer.
- Introduction
- Custom MFA Solution Overview
- Lab Environment
- MFA Configuration
- MFA Testing
- Under the Hood
- Auditing
Introduction
IdentityIQ 7.2 introduced Multi-factor authentication feature by means of which either all or a set of users can be forced to login with some other parameters what "they have" along with user name/password what "they know". IdentityIQ supports configuring DUO or RSA based multi-factor authentication out-of-the-box and that has been documented in IdentityIQ 7.2: Multi-Factor Authentication .
In this document, how a custom multi-factor authentication solution (tried within a simplified demo setup) can be integrated with IdentityIQ and implementation details will be discussed.
Custom MFA Solution Overview
For the sake of simplicity, the custom MFA solution is based on OTP as second factor authentication. The second factor authentication will be applicable to a set of users categorized as "External" user in this demo setup.The authentication flow would be as following:
1. User access IdentityIQ URL http(s)://<host>:<port>/identityiq. IdentityIQ prompts for user name and password as usual.
2. User enters correct user name/password and click on "Login" button.
3. IdentityIQ validates the credential. If found incorrect, appropriate error message will be displayed and flow ends here.
4. If user entered user name and password correctly based on step 4, then first factor authentication is completed successfully.
5. IdentityIQ validates whether the logged in user is external user or not. If no, user will be navigated to IdentityIQ home and the flow ends here
6. If the logged in user is found to be an external user based on step 5, an OTP form will be presented to end user
7. End user will enter the OTP sent to it via email in the form and click on "Authenticate" button
8. If entered OTP is found correct and has been entered within configured timeout, then the user will be navigated to IdentityIQ home and flow ends here
9. If entered OTP is found wrong or expired, then appropriate error message will be displayed.
The solution will make below authentication parameters configurable through a form dynamically without needing to alter any code:
1. OTP Length - Number of alphanumeric characters in OTP
2. OTP Timeout - Time in minute(s) after which the OTP will be treated as invalid
3. OTP Validation Case-sensitive - A checkbox to make OTP validation case-sensitive or not
4. Trace Execution - A checkbox to enable workflow trace for troubleshooting
Lab Environment
Virtual Hosting - Oracle VM Virtualbox Manager
Platform - Windows 7 64-bit
Java - Java 1.8
Application Server - Apache Tomcat 8.5
Database - MySQL 5.7
IdentityIQ - 7.2
MFA Configuration
Follow below steps sequentially to configure the MFA solution in IdentityIQ:
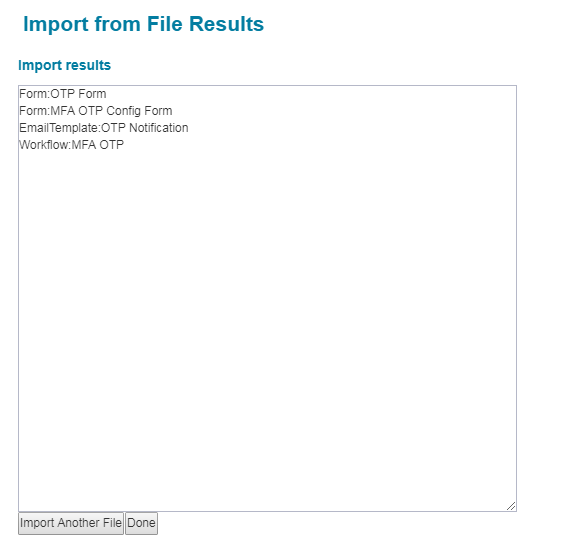
1. Login to IdentityIQ using system admin credential and navigate to Gear Menu->Global Settings->Import from File. Import the attached XML into IdentityIQ. Upon successful authentication, 4 objects will be imported into IdentityIQ.
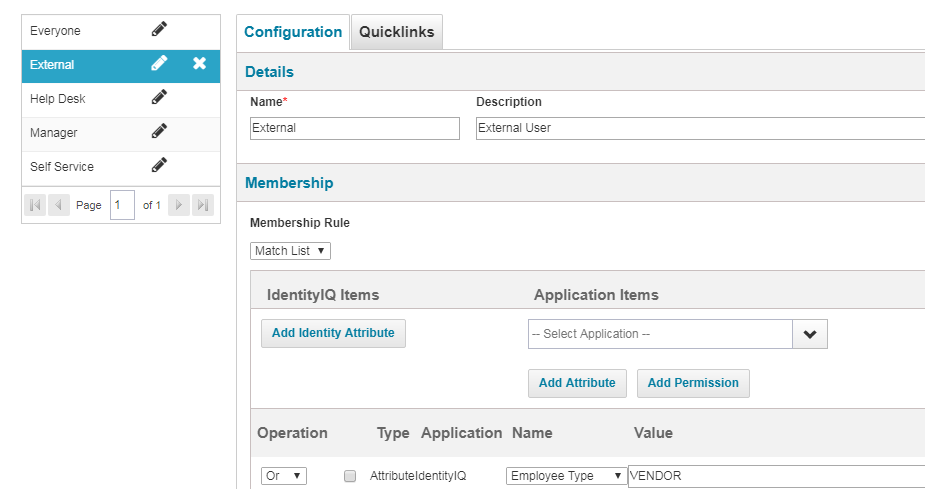
2. Create one Quicklink population either using UI (Gear menu->Global Settings->Quicklink Populations) or debug page (Creating a DynamicScope object).The population will determine the set of users needing multi-factor authentication to access IdentityIQ.
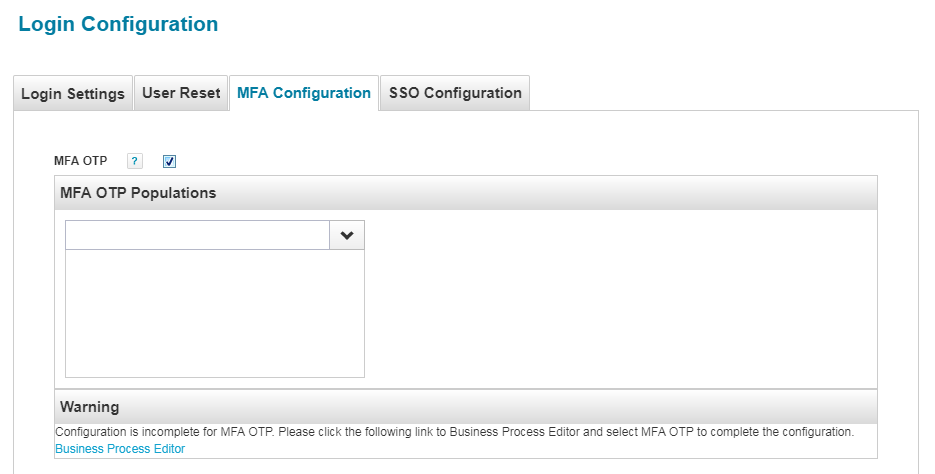
3. Navigate to Gear menu->Global Settings->Login Configuration. Under "MFA Configuration" tab, a checkbox for OTP based authentication will be displayed. Select the checkbox to enable the authentication scheme.
4. Choose the intended user population from the drop down and click on "Save" button.
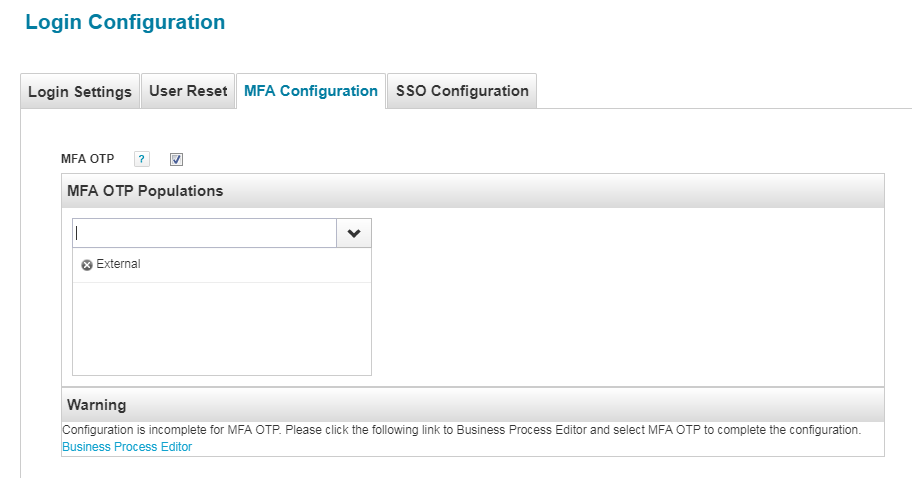
5. You might have noticed the Warning text saying MFA configuration is still incomplete as shown in above screenshot. To complete the configuration, navigate to Setup->Business Processes menu. From the left hand side pane, search "MFA OTP" workflow and navigate to "Process Variables" tab.

6. Provide values to the parameters as per your need. Refer to the help icon to understand more about the fields though all are quite self-explanatory. Click on "Save" button to save the changes.
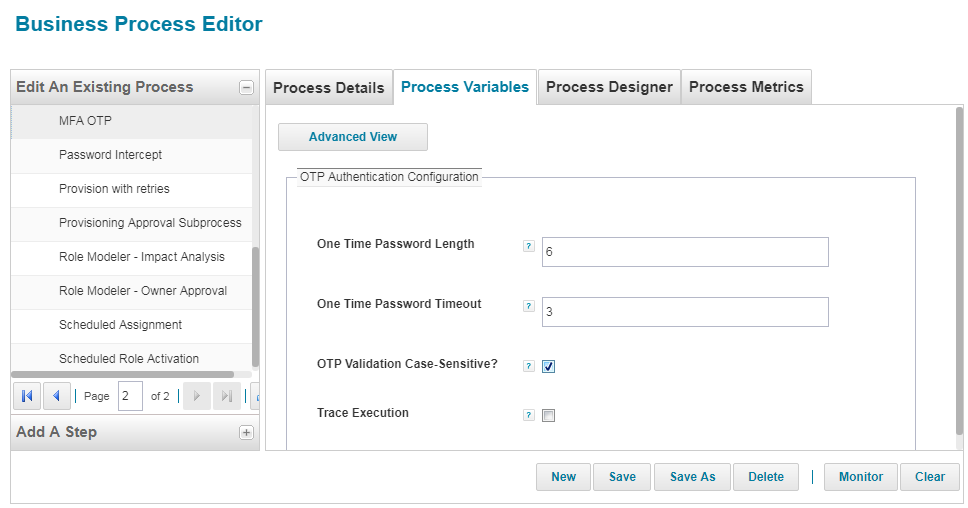
7. Go back to Gear menu->Global Settings->Login Configuration to make sure the previously shown warning text is not showing up anymore.
8. In order to get OTP email, either configure SMTP server or redirect to file based on infrastructure availability in IdentityIQ through Gear Menu->IdentityIQ Configuration->Mail Settings
8. The configuration is completed here.
MFA Testing
After successfully completing all required configuration, time is to check whether it is working as expected or not. For that, you need to have at least two test Identity Cubes handy, one part of the configured population and another not part of it to do negative testing.
1. Access SailPoint IdentityIQ URL and enter the user ID and password of the Identity Cube who is part of the configured population
2. Upon successful user ID and password authentication, another form will be displayed to the user to enter OTP
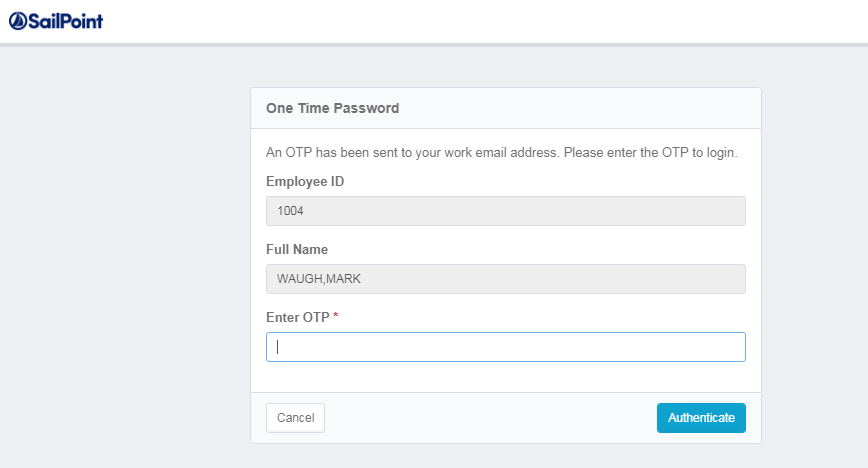
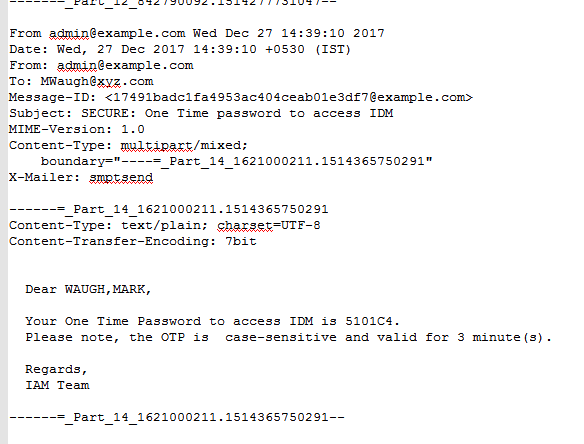
3. Refer to the email (either in your inbox or file as shown below) to get the randomly generated OTP and enter it within stipulated timeout time. Hit "Authenticate" button
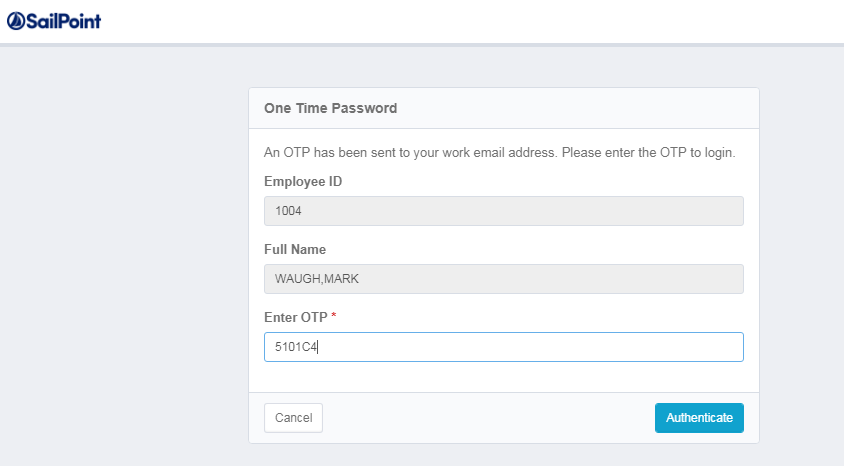
4. Upon successful OTP validation, user will be navigated to home page
5. if OTP entered correctly after configured timeout or wrongly, appropriate error message will be displayed on UI. Another OTP will also be sent simultaneously
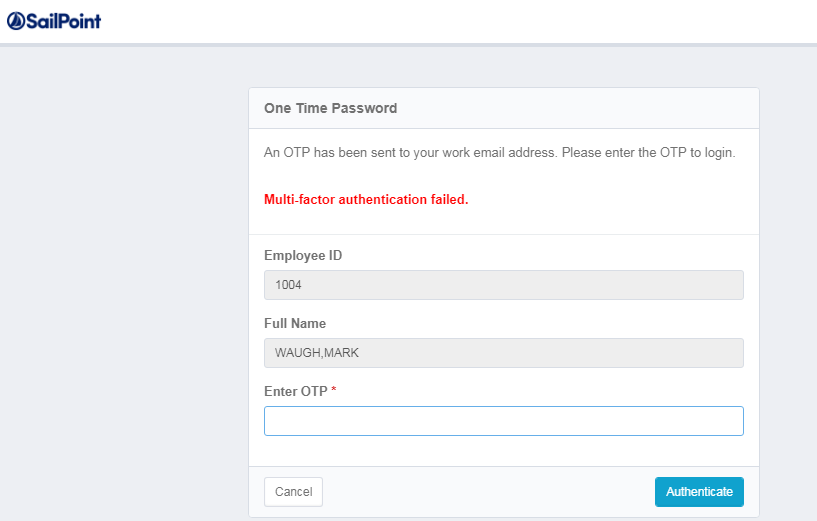
6. Click on "Cancel" button to go back to login page
Under the Hood
This demo is primarily to unearth the flow of MFA where no application is required to be on-boarded into IdentityIQ as opposed to DUO/RSA MFA flow explained in the SailPoint documentation. Although SailPoint implementation of MFA is clearly explained in the product documentation but here as few important points are listed below based on my understanding:
1. IdentityIQ MFA feature is primarily workflow driven meaning upon password authentication, it relies upon a workflow to initiate MFA flow
2. IdentityIQ relies upon "Quicklink Populations" to deteremine target audiences requiring MFA to access IdentityIQ web console
3. IdentityIQ introduced a new workflow type "MultifactorAuthentication" which helps IdentityIQ to understand what all MFA providers are present in IdentityIQ
4. IdentityIQ MFA feature also brings in a new workflow library i.e. sailpoint.workflow.MFALibrary present in identityiq.jar file. It exposes amny workflow methods being used in DUO/RSA MFA.
5. A workflow configuration form is used to set the configurable items required for OTP based authentication like OTP length, timeout etc. The values are persisted in workflow variable by means of "initializer" attribute
6. IdentityIQ automatically makes the identity object who already completed password authentication available to MFA workflow
7. There is one built-in variable available in multi-factor authentication type workflow namely "mfaResponseMessage" which can be displayed on the form in case of any error during MFA. The variable is set using addMFAMessage library method call.
8. The MFA error message can be customized by adding a new value to the property key "ui_mfa_failed" in iiqCustom.properties file followed by server restart
9. This custom solution generates an OTP using Java "UUID" class which generates an universally unique identifier. The code replaces the hyphen ('-') and then cut out configured number of characters from the string followed by returning the same in upper case. For the sake of keeping this proof-of-concept simple, this logic of generating OTP is also kept very simple and indicative only. During real time deployment, some third-party library or complex logic should be coded to generate unique OTP.
Auditing
If MFA event audit is required be configured in IdentityIQ, then follow below steps:
1. Add a new AuditAction entry in AuditConfig object through debug page
<AuditAction displayName="MFA" enabled="true" name="mfa"/>
2. Navigate to Gear Menu->Global Settings->Audit Configuration and make sure the new audit action added above is showing up on UI and enabled.

That's it. Once enabled, audit events will be logged in IdentityIQ and those can be seen from Advanced Analytics like below:

- Mark as Read
- Mark as New
- Bookmark
- Permalink
- Report Content to Moderator
Thank you so much!
- Mark as Read
- Mark as New
- Bookmark
- Permalink
- Report Content to Moderator
Thank you for this detailed document.
But I am facing one issue. I am creating a quick link population where I am including 5 identities under include identities but this MFA authentication is happening for all the users apart from these 5 users.
Can you please help me with this where I am going wrong?
Thanks
- Mark as Read
- Mark as New
- Bookmark
- Permalink
- Report Content to Moderator
Thanks for great and simple MFA solution without the need of any external component.
- Mark as Read
- Mark as New
- Bookmark
- Permalink
- Report Content to Moderator
This is the method we are currently using, and it works great. The only two questions I received from management are:
1. Is there a way to mask the PIN when typing it in?
2. Can we modify the Authenticate button, so that after entering the PIN, we can just hit Enter, instead of having to click the button?
- Mark as Read
- Mark as New
- Bookmark
- Permalink
- Report Content to Moderator
I'm getting a NullPointerException on the Authenticate button of the OTP Form. Tracing shows that the "completer" Identity on the form is null.
Explanation point 6 above states "IdentityIQ automatically makes the identity object who already completed password authentication available to MFA workflow" but it looks like this is not the case for me. Is there an additional step required?
- Mark as Read
- Mark as New
- Bookmark
- Permalink
- Report Content to Moderator
For info, and in response to my own question, above - The MFA page is external and so there is no current logged in user. The external functionality is similar to that of Self Registration users, and so I found I had to provide a value for the selfRegistrationGroup System Configuration attribute. This was an empty Workgroup I created for the purpose of "compelting" the form.
I still feel I'm missing something unless everyone previously happen to be using Self Registration?
- Mark as Read
- Mark as New
- Bookmark
- Permalink
- Report Content to Moderator
thanks for sharing

