- Products & services Products & services
- Resources ResourcesEducation
- Education
- Identity University Get technical training to ensure a successful implementation
- Training paths Follow a role-based or product-based training path
- SailPoint professional certifications & credentials Validate your identity security knowledge
- Training onboarding guide Make of the most of training with our step-by-step guide
- Training FAQs Find answers to your training questions
- Community CommunityKnowledge
- Knowledge
- IdentityIQ wiki Discover crowd sourced information or share your expertise
- IdentityNow wiki Discover crowd sourced information or share your expertise
- File Access Manager wiki Discover crowd sourced information or share your expertise
- Submit an idea Get writing tips curated by SailPoint product managers
Community Corner- Community Corner
- Customer Success Engineering Meet the team and see their responses to most frequent customer FAQs
- SailPoint community benefits Learn, collaborate, and celebrate your achievements
- North Star program North Stars earn exclusive benefits for their contributions to the community
- Customer awards 2025 Nominate your team to be recognized as Identity Security Champions
- Compass
- :
- Discuss
- :
- Community Wiki
- :
- IdentityNow Wiki
- :
- SailPoint AuditEvent Integration for Amazon Security Lake - Setup and User Guide
- Article History
- Subscribe to RSS Feed
- Mark as New
- Mark as Read
- Bookmark
- Subscribe
- Printer Friendly Page
- Report Content to Moderator
SailPoint AuditEvent Integration for Amazon Security Lake - Setup and User Guide
SailPoint AuditEvent Integration for Amazon Security Lake - Setup and User Guide
The Open Cybersecurity Schema Framework (OCSF) is an open-source effort to facilitate interoperability of cybersecurity data across platforms and tools by establishing a standardized schema for common security events and defining a collaborative governance process for security log producers and consumers. The SailPoint Identity Security Cloud AuditEvent Integration for Amazon Security Lake is designed to provide customers the ability to extract audit information from an Identity Security Cloud tenant, transform those events into an OCSF schema, and store the data in an Amazon Security Lake.
- More about Amazon Security Lake
- More about the /search API used by the integration
- Overview
- Infrastructure
- Process Flow
- AuditEvent Transformation to OCSF
- Integration Setup
- Prerequisites
- Step 1: Custom Sources Setup
- Step 2: IdentitySecurity Cloud OAuth2.0 Configuration
- Step 3: AWS CloudFormation
- CloudFormation Configuration
- CloudFormation Parameters
- Testing
- Schedule the Lambda Function
Overview
Infrastructure
The integration utilizes a set of cloud based AWS resources to automate the process of delivering audit event data in an OCSF compliant schema to an Amazon Security Lake custom source location. The components included in this integration are:
Lambda Package: sailpoint_ocsf_lambda_package.zip contains a python script, libraries, and json mapping data files for transforming audit events from the Identity Security Cloud API to an OCSF compliant schema.
Glue ETL script: sailpointOCSFGlueETL.py is a Python script that transforms the json output provided by the Lambda function into a parquet format for storage in Amazon Security Lake.
CloudFormation template: cloudformation.yaml is provided to build the AWS resource stack.
Process Flow
|
 |
AuditEvent Transformation to OCSF
AuditEvents in Identity Security Cloud represent "things of interest" that occur during the normal day to day operations of Identity Security Cloud. The AuditEvent types supported for transformation into OCSF can be found in ocsf_map.json. Each top level key in the file is named for the "type" value associated with a "_type": "event". The key-value pairs nested in "staticValues" include the settings for identifying the OCSF schema that each event of that type will be transformed into.
- "category_name" - The assigned OCSF schema category
- "category_uid" - The ID number associated with the assigned category_name
- "class_name" - The OCSF schema class within the assigned category
- "metadata.version" - The OCSF Schema Version
It should be noted that the intention behind this integration is not to capture every event from Identity Security Cloud, but rather a selection of events which apply to an OCSF class and category. Only top level keys in ocsf_map.json that match event values in "type": "event" will be captured by this process. The ocsf_map.json file can be inspected in this integrations GitHub repository.
|
OCSF Schema Category |
OCSF Schema Class |
Metadata Version |
|
|
AUTH |
1.0.0-rc.2 |
||
|
PASSWORD_ACTIVITY |
1.0.0-rc.2 |
||
|
USER_MANAGEMENT |
1.0.0-rc.2 |
||
|
ACCESS_ITEM |
1.0.0-rc.2 |
||
|
PROVISIONING |
1.0.0-rc.2 |
||
|
SYSTEM_CONFIG |
1.0.0-rc.2 |
Integration Setup
Prerequisites
Prior to beginning the setup process for this integration an Amazon Security Lake account must be enabled and custom sources must be setup. For an overview please see the Amazon Security Lake Getting Started guide and Collecting data from custom sources.
The CloudFormation process should be performed by an AWS administrator. For more about CloudFormation see What is AWS CloudFormation?
The integration requires the use of a Personal Access Token from your Identity Security Cloud tenant. It is recommended that when using the 'client_credentials' mechanism with a Personal Access Token, that a service account is created in Identity Security Cloud for this process. These credentials are saved in an SSM Parameter and a Secret manager resource during the CloudFormation process.
Step 1: Custom Sources Setup
|
1. Open the Amazon Security Lake console 2. Click on Custom Sources in the left navigation menu. |

|
|
3. Click the Create custom source button. |

|
|
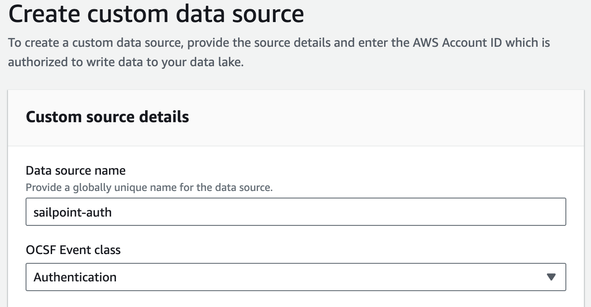
4. In Custom source details enter the following information:
|
|
|
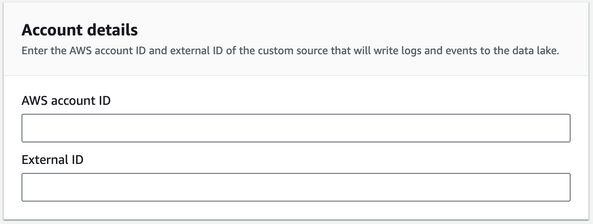
5. In Account details enter the following information:
|
|
|
6. In Service Access choose “Create and use a new service role” 7. Click the Create button 8. Repeat this process 2 more times for the following Data Source Names and Event Classes:
*It is important that these data source names are input exactly as provided for the integration to function properly. |

|
Step 2: Identity Security Cloud OAuth2.0 Configuration
|
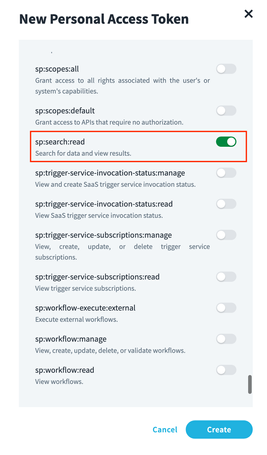
A personal access token is required to generate access tokens to authenticate API calls. See this guide for instructions on how to generate a personal access token. Note: When you setup your personal access token, be sure to enable the scope ‘sp:search:read’ and only this scope. Save your Client ID and Client Secret for use during the Cloud Formation process. |
|
Step 3: AWS CloudFormation
AWS CloudFormation handles the provisioning of a resource stack. This integration includes cloudformation.yaml which is a template specifically designed to provision all of the resource components necessary to enable the integration. We recommend using this template to provision AWS resources.
To obtain the CloudFormation template visit the GitHub repository release page and download cloudformation.yaml from release 1.0.0. The template provisions the following resources:
|
Logical ID |
Type |
Purpose |
|
CopyFilesToS3 |
AWS::Lambda::Function |
Lambda function to copy source code from GitHub to S3. |
|
JsonClassifier |
AWS::Glue::Classifier |
Used by SailPointGlueCrawler to collect metadata from json audit event data. |
|
LakeFormationDatabaseCrawlersPermissions |
AWS::LakeFormation::Permissions |
Grants permission for Glue to use a database to store and access metadata collected by a Crawler. |
|
LakeFormationDataLocationCrawlerPermissions |
AWS::LakeFormation::Permissions |
Grants permission for a Glue Crawler to collect metadata from json audit event data. |
|
LakeFormationDataLocationResource |
AWS::LakeFormation::Resource |
Gives Lake Formation permission to use a service linked role to access json log data. |
|
OCSFDatabase |
AWS::Glue::Database |
Database to store audit event data temporarily before it is transformed from json to parquet. |
|
S3Copy |
Custom::CopyToS3 |
Custom code used by CopyFilesToS3 Lambda function. |
|
S3CopyLambdaExecutionRole |
AWS::IAM::Role |
Gives CopyFilesToS3 Lambda function permission to write files to SourceCodeS3Bucket. |
|
SailPointGlueCrawler |
AWS::Glue::Crawler |
Collects metadata from json audit event data, needed for parquet file conversion. |
|
SailPointGlueETLJob |
AWS::Glue::Job |
Runs the code in sailpointOCSFGlueETL.py to transform data from json to parquet. |
|
SailPointLambdaAssumableRole |
AWS::IAM::Role |
Grants permission for SailPointLambdaFunction to assume roles created during custom source creation. |
|
SailPointLambdaExecutionRole |
AWS::IAM::Role |
Grants various permissions for SailPointLambdaFunction on SailPointOCSFGlueCrawler, OCSFDatabase, SailPointSSMParameter and TempFileS3Bucket |
|
SailPointLambdaFunction |
AWS::Lambda::Function |
This is the main function that will execute the data ETL process. |
|
SailPointOCSFGlueRole |
AWS::IAM::Role |
Grants permission for Glue resources on TempFileS3Bucket, SourceCodeS3Bucket and Lake Formation |
|
SailPointSSMParameter |
AWS::SSM::Parameter |
This parameter is used to store the date/time of the last event captured from the Identity Security Cloud API. |
|
SecretManagerResource |
AWS::SecretsManager::Secret |
This resource is used to store the Identity Security Cloud personal access token Client Secret value. |
|
SourceCodeS3Bucket |
AWS::S3::Bucket |
A bucket used to store code used by SailPointGlueETLJob and SailPointLambdaFunction |
|
TempFileS3Bucket |
AWS::S3::Bucket |
Temporary storage for transformed audit events in json format |
CloudFormation Configuration
|
1. Open the CloudFormation console. 2. In the top right corner click the Create Stack button and choose With new resources (standard). |
 |
|
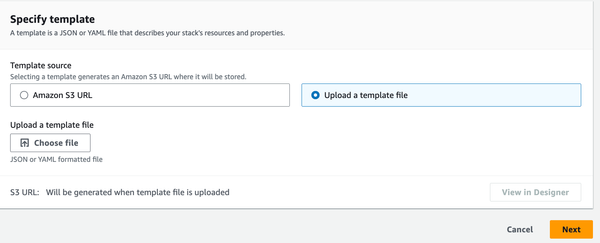
3. On the Specify template section choose Upload a template file. 4. Click the Choose file button and browse to the cloudformation.yaml file provided, then click Next. |
 |
|
5. In the Stack name section choose a name for this resource stack (For example, SailPointResourceStack). |
 |
|
6. Review the Parameters section carefully. Some values have been provided as default values that you can change to fit your needs. Values are required for each parameter. (See the CloudFormation Parameters table below for detailed instructions) |
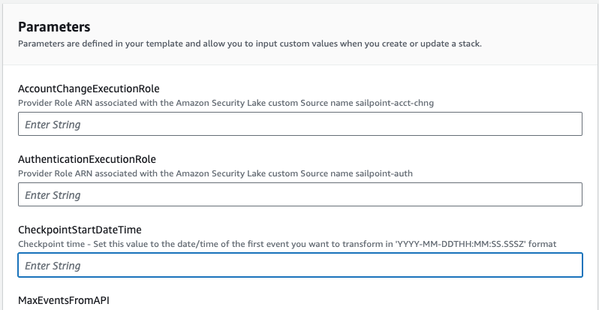
|
|
7. No changes are required for the Configure stack options settings. These settings can be altered according to your preferences. When your review is complete, click Next. 8. The last screen will be for review and acknowledgement. When you scroll down to the bottom you will see an information box indicating that the template contains IAM resources. You must acknowledge this in order to proceed. Click the acknowledgment check box, then click Submit. |
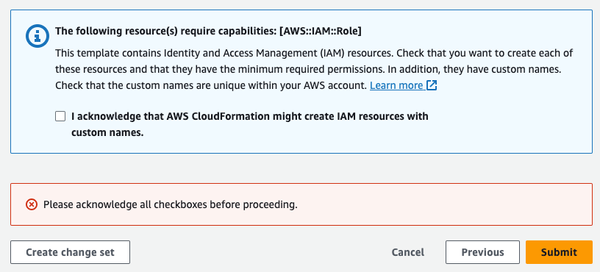
|
CloudFormation Parameters
| Parameter Name | Definition | Instructions |
| AccountChangeExecutionRole |
Provider Role ARN associated with the Amazon Security Lake custom Source name sailpoint-acct-chng. |
This should be copied from your Security Lake console.
|
| AuthenticationExecutionRole | Provider Role ARN associated with the Amazon Security Lake custom Source name sailpoint-auth. |
This should be copied from your Security Lake console.
|
| MaxEventsFromAPI |
Number of events to request from SailPoint API during each run (10000 max) |
This value can be changed at any time in Configuration -> Environment Variables -> MaxEventsFromAPI for the SailPointOCSFLambdaFunction Lambda function. |
| SailPointClientID |
Personal Access Token ClientID value |
The ClientID from the Personal Access Token you created in your Identity Security Cloud Tenant (from Step 2) |
| SailPointClientSecret |
Personal Access Token Client Secret value |
The Client Secret from the Personal Access Token you created in your Identity Security Cloud Tenant (from Step 2) |
| SailPointTenantName | The tenant name associated with your Identity Security Cloud Tenant | https://{SailPointTenantName}.identitynow.com |
| ScheduledJobActivityExecutionRole |
Provider Role ARN associated with the Amazon Security Lake custom Source name sailpoint-sched-job. |
This should be copied from your Security Lake console.
|
| SecurityLakeAccountID | Target AWS Account ID for Amazon Security Lake data | Enter the AWS Account ID associated with your Amazon Security Lake configuration. This is the account that has your custom sources configured. |
| SecurityLakeDatabaseName | The name of the database for Amazon Security Lake data. |
This value can be found in your AWS Lake Formation console.
|
| SecurityLakeExternalID |
The External ID associated with each Amazon Security Lake custom source. |
This must be set to same value that was used for External ID when you setup your custom sources. |
| SecurityLakeS3Bucket | Name of the S3 bucket where your Amazon Security Lakes Custom Source data is stored. |
This should be copied from your Security Lake console.
|
Testing
|
1. From the CloudFormation stacks screen click on the name of your stack and select the Resources tab. 2. Click the link to SailPointOCSFLambdaFunction in the Physical ID column. |
 |
| 3. Click on the Test tab, then click on the Test button. You will see the Executing Function message in the information dialog box. Depending on the value you specified for MaxEventsFromAPI the operation will take from 5 to 10 minutes to complete. You can click on Details to see a summary of the operation after completion. |  |
|
4. Open your S3 console and browse to the location for your Security Lake custom source data. You should see one folder for each of the OCSF custom sources you created. Within each folder you should see the following hierarchy representing the partitioned data: ext/region={region}/accountId={accountID}/eventDay={YYYYMMDD}/ |
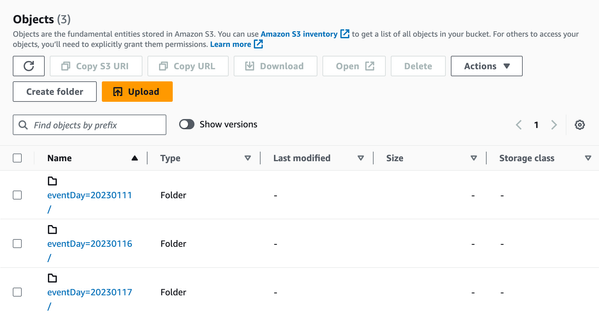 |
| 5. Check one of the eventDay folders for the parquet file data left by the script. Select the checkbox next to one parquet file, then select Query with S3 select from the Actions menu. | 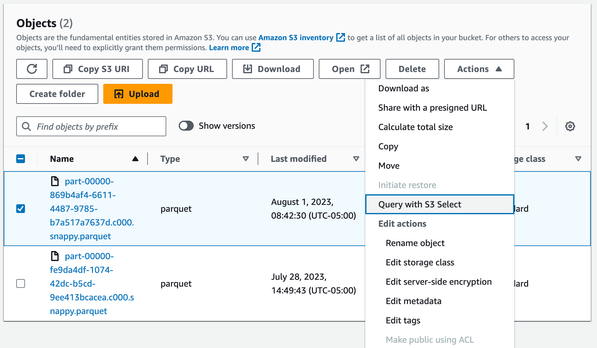 |
| 6. In the Input settings section make sure Apache Parquet is selected. |  |
| 7. In the Output settings section select JSON Format. | 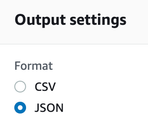 |
|
8. In the SQL query section, use the default query to select 5 records from the file. 9. Click the Run SQL query button. You should see 5 events converted to the OCSF schema* |
 |
* You should notice that the first object in each record named “data” contains the original source record from the SailPoint API. “data” is an optional JSON object provided in the OCSF v1.0.0-rc.2 schema that has been chosen to use to store the original event data and schema for reference.
Schedule the Lambda Function
We recommend running the Lambda function (SailPointLambdaFunction) at intervals no more frequent than once every hour. You can use Amazon EventBridge to accomplish this. See Tutorial: Schedule AWS Lambda functions using EventBridge
- Mark as Read
- Mark as New
- Bookmark
- Permalink
- Report Content to Moderator
Thank you for sharing.

